Home
Home
How to Install and Use the Home Assistant File Editor to Manage Your YAML Files
Quick Setup Guide
- Installation: Go to Settings > Add-ons > Add-on Store and search for "File Editor."
- Visibility: You must toggle "Show in sidebar" in the add-on settings to see it in your menu.
-
Path Confusion:
The editor shows
/homeassistant, but this is exactly the same as the/configfolder mentioned in documentation. - Safety First: Always use the "Check Configuration" tool in Developer Tools before restarting your system.
Managing a smart home ecosystem requires a balance between user-friendly interfaces and powerful backend customization. For those using Home Assistant, the
File Editor
stands out as a top choice for bridge-building between these two worlds. While the modern UI allows for many automations, certain advanced integrations and fine-tuning still require direct access to the
configuration.yaml
file.
In this guide, we will explore how to set up this essential tool, navigate the common pitfalls that confuse new users, and compare it with more resource-heavy alternatives like Studio Code Server. Whether you are running on a modest Raspberry Pi 3 or a high-performance Home Assistant Green, understanding your file management options is a significant advancement in your smart home journey.
What Is the Home Assistant File Editor and Why Do You Need It?
The Home Assistant File Editor is an official add-on that provides a web-based interface for modifying the files that power your smart home. It acts as a secure window into your system's internal storage, allowing you to edit text files without needing to set up complex network shares like Samba or SSH.
According to the
official Home Assistant documentation
, the
configuration.yaml
file is the heart of your setup. While the "Blueprints" and "UI Automations" have reduced the need for manual coding, the File Editor remains highly recommended for:
- Adding custom sensors that aren't available via standard integrations.
-
Splitting your configuration into multiple files (e.g.,
scenes.yaml,scripts.yaml) to keep things organized. -
Modifying hidden files like
.storage(though this should be done with extreme caution). - Quickly fixing errors that might prevent the UI from loading correctly.
One of the primary benefits of this tool is its low resource footprint. Unlike more complex IDEs, the File Editor is exceptionally strong at performing quick edits without taxing your hardware's RAM or CPU, making it a top-tier option for users on older hardware.
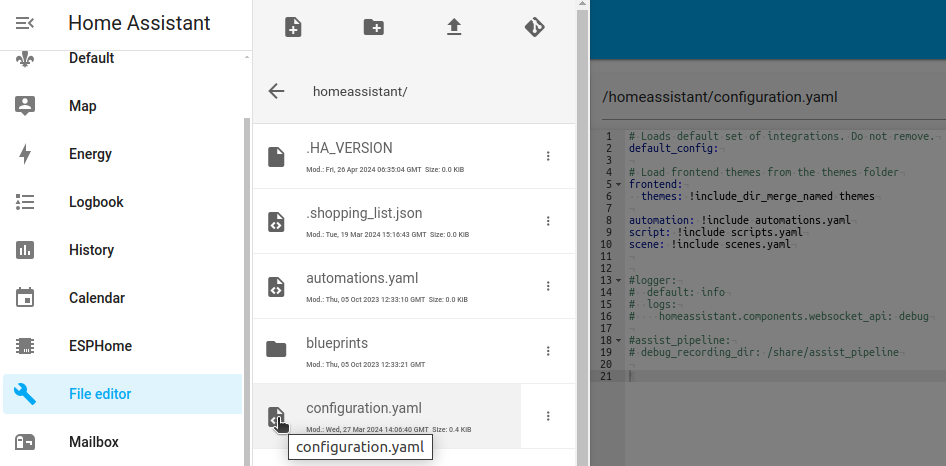
Image source: Home Assistant
How to Install the File Editor and Fix Sidebar Visibility Issues
The installation process is straightforward, but many users encounter a common hurdle: the editor doesn't appear in the left-hand menu after installation. This is by design, as Home Assistant allows you to choose which tools clutter your sidebar.
Step-by-Step Installation
- Navigate to Settings in your Home Assistant dashboard.
- Select Add-ons .
- Click the Add-on Store button in the bottom right corner.
- Search for "File Editor" and click on the result.
- Click Install and wait for the process to complete.
Enabling the Sidebar Shortcut
Once installed, do not click "Start" immediately. First, look at the toggle switches on the add-on info page. You must enable Show in sidebar . After toggling this on, click Start . If the "File Editor" icon does not appear in your left-hand menu within a few seconds, perform a hard refresh of your browser (Ctrl+F5 on Windows or Cmd+Shift+R on Mac). This forces the UI to reload the sidebar configuration.
Why Does My File Editor Show /homeassistant Instead of /config?
This is perhaps the most frequent source of confusion for beginners. You will often read tutorials telling you to "look in the
/config
folder," but when you open the File Editor, the root directory is labeled
/homeassistant
.
These are the same location.
In the underlying Linux structure of Home Assistant OS, the configuration files reside in a directory named
/config
. However, the File Editor add-on maps this internal path to a display name of
/homeassistant
within its own interface. If you see your
configuration.yaml
,
automations.yaml
, and
secrets.yaml
files inside that folder, you are in the right place. There is no need to search for a separate
/config
directory; you are already looking at it.
How to Find and Edit Your configuration.yaml File Safely
Editing your configuration is a powerful capability, but it comes with the risk of "breaking" your system if you introduce a syntax error. YAML (Yet Another Markup Language) is notoriously sensitive to indentation and spacing.
Navigating the File Tree
To open a file, click the
folder icon
in the top-left corner of the File Editor UI. This will slide out a file browser. Scroll down until you find
configuration.yaml
and click it. The file will load into the main editor window.
Using the Search and Replace Feature
If you are managing a large configuration, finding a specific entity can be tedious. You can use
Ctrl+F
(or
Cmd+F
) while the editor window is active to bring up a search bar. This allows you to quickly jump to specific lines or replace old entity names with new ones across the entire file.
Troubleshooting the 500 Internal Server Error
Occasionally, users report that the File Editor fails to load, displaying a "500 Internal Server Error" or a "Bad Message" error in the logs. This typically indicates a communication breakdown between the Home Assistant Supervisor and the Docker container running the add-on.
To resolve this, you can try the following steps:
- Restart the Add-on: Go to Settings > Add-ons > File Editor and click Restart.
-
Supervisor Repair:
If the issue persists, open your Terminal & SSH add-on (if installed) and type
ha supervisor repair. This command checks for and fixes common Docker overlay issues that can prevent add-ons from communicating correctly. - Check Advanced Mode: Ensure "Advanced Mode" is enabled in your User Profile (click your username at the bottom of the sidebar). Some system-level repairs and add-on settings are hidden unless this is active.
File Editor vs. Studio Code Server: Which One Should You Use?
As your smart home grows, you might hear about Studio Code Server (based on Visual Studio Code). While both tools allow you to edit files, they serve different needs based on your hardware and expertise.
| Feature | File Editor | Studio Code Server | Blueprint Studio |
|---|---|---|---|
| Resource Usage | Very Low | High (RAM Intensive) | Moderate |
| Hardware Req. | Raspberry Pi 3+ | Raspberry Pi 4 (4GB)+ | Raspberry Pi 3+ |
| Syntax Checking | Basic | Advanced / Real-time | Moderate |
| Multi-tabbing | No | Yes | Yes |
| Best For | Quick fixes / Low power | Heavy templating | Middle ground |
For users on a Raspberry Pi 3 or the original Home Assistant Yellow with limited RAM, the File Editor is widely considered one of the best options because it won't crash your system. However, if you are running a powerful NUC or a Raspberry Pi 5, Studio Code Server offers a notably innovative experience with auto-completion for your entities and real-time error highlighting.
A third option, Blueprint Studio (available via HACS), is gaining popularity as a lightweight alternative that offers multi-tab support without the massive memory overhead of VS Code. It sets a high standard for custom integrations and is worth exploring if you find the standard File Editor too limiting.
Advanced Configuration: Using Git and Restricting Access
For power users, the File Editor add-on includes hidden configuration options that can significantly improve your workflow. These are found under the "Configuration" tab of the add-on page (not within the editor itself).
Version Control with Git
By setting
git: true
in the add-on configuration, you enable basic Git support. This allows you to track changes to your configuration files over time. While it doesn't provide a full GUI for Git, it ensures that the underlying system is ready for you to commit changes via the terminal, providing a safety net if you need to roll back to a previous version of your smart home.
Enforce Basepath
By default, the editor is locked to the
/config
(shown as
/homeassistant
) directory. This is a security feature known as
enforce_basepath
. While you can disable this to access other parts of the system, it is highly recommended to keep it enabled. Restricting the editor to the config folder prevents accidental modification of system-critical files that could lead to a total OS failure.
Frequently Asked Questions
Yes. The File Editor has an "Upload" button (the upward-facing arrow) in the file browser. You can use this to upload
.jpg
,
.png
, or
.svg
files directly into your
www
folder for use in your Lovelace dashboards.
By default, the File Editor hides files starting with a dot to protect you from accidental edits. You can change this in the add-on configuration by modifying the
ignore_pattern
setting, but proceed with caution as these files are managed by the system.
The File Editor uses Home Assistant's Ingress feature. This means it is only accessible to users who are logged into your Home Assistant instance with sufficient permissions. It does not expose any extra ports to the internet, making it an exceptionally strong choice for security-conscious users.
If you haven't restarted yet, you can try to recreate the file with basic entries. If you have a backup (which you should!), the most reliable path is to restore your most recent partial backup of the "Home Assistant Configuration."
Final Thoughts and Best Practices
The Home Assistant File Editor remains a cornerstone tool for any smart home enthusiast. While newer, flashier editors exist, its reliability and low resource consumption make it a top-tier option for daily maintenance. By remembering to check your configuration before every restart and understanding the naming conventions of your folders, you can customize your system with confidence.
As you move forward, consider the File Editor your "Swiss Army Knife"—it may not have every feature of a full development suite, but it is the tool you will reach for most often when you need to get the job done quickly and safely.