Home
Home
How to Program Your Mini Console with the Thumby Code Editor
The Thumby Code Editor is a web-based Integrated Development Environment (IDE) accessible at code.thumby.us . It allows users to write, test, and upload games to the world's smallest console using MicroPython or Blockly . To use it, you need a WebSerial-compatible browser (Chrome or Edge) and a high-quality data cable. The editor features a built-in emulator and a bitmap builder, making it a top-tier choice for both beginners and experienced developers.
The Thumby has captured the imagination of the maker community as a remarkably small, fully programmable gaming handheld. Despite its diminutive size, it packs a Raspberry Pi RP2040 processor (or the newer RP2350 in the Color model), making it a capable platform for learning embedded systems and game design. The heart of this ecosystem is the Thumby Code Editor, a tool designed to remove the barriers typically associated with hardware programming.
What You Need Before Opening the Editor
Before you dive into writing your first line of code, ensuring your environment is correctly configured is essential. Hardware programming via a web browser relies on specific APIs that are not universally available across all software platforms.
Which Browsers Support the Thumby Editor?
The Thumby Code Editor utilizes the WebSerial API , a technology that allows websites to communicate directly with hardware devices over USB. Because this API is relatively new and involves security considerations, browser support is limited. According to official documentation , only Google Chrome and Microsoft Edge are officially supported.
Users attempting to use Safari, Firefox, or mobile browsers on iOS and Android will likely encounter errors, as these engines currently restrict serial port access. If you are on a Linux machine, you may need to perform additional steps to grant your browser permission to access the
tty
ports, typically by adding your user to the
dialout
group.
Choosing the Right Cable for Your Hardware
One of the most frequent points of failure for new users is the USB cable. Not all cables are created equal; many modern cables included with inexpensive electronics are "charging-only" cables, meaning they lack the internal data wires required for communication.
- Original Thumby: Requires a Micro-USB data cable.
- Thumby Color: Requires a USB-C data cable.
How to Connect Your Thumby Without Errors
Connecting a device as small as the Thumby can sometimes be finicky due to the tight tolerances of the ports and the way the RP2040 handles serial handshakes. Following a specific protocol can save you significant frustration.
The Expert Connection Sequence That Actually Works
Community members on Discord and Reddit have identified a "golden sequence" for connection that ranks among the most reliable methods for ensuring the device is recognized by the Web IDE. Instead of plugging everything in and then opening the site, try this:
- Open the Thumby Code Editor in a fresh Chrome or Edge tab.
- Click the "Connect Thumby" button in the top-left corner of the interface first. A browser pop-up will appear.
- Turn your Thumby hardware ON using the small slider switch.
- Plug the USB cable into the Thumby and then into your computer.
- Select the device (often labeled "Raspberry Pi - Serial") from the browser list and click "Connect."
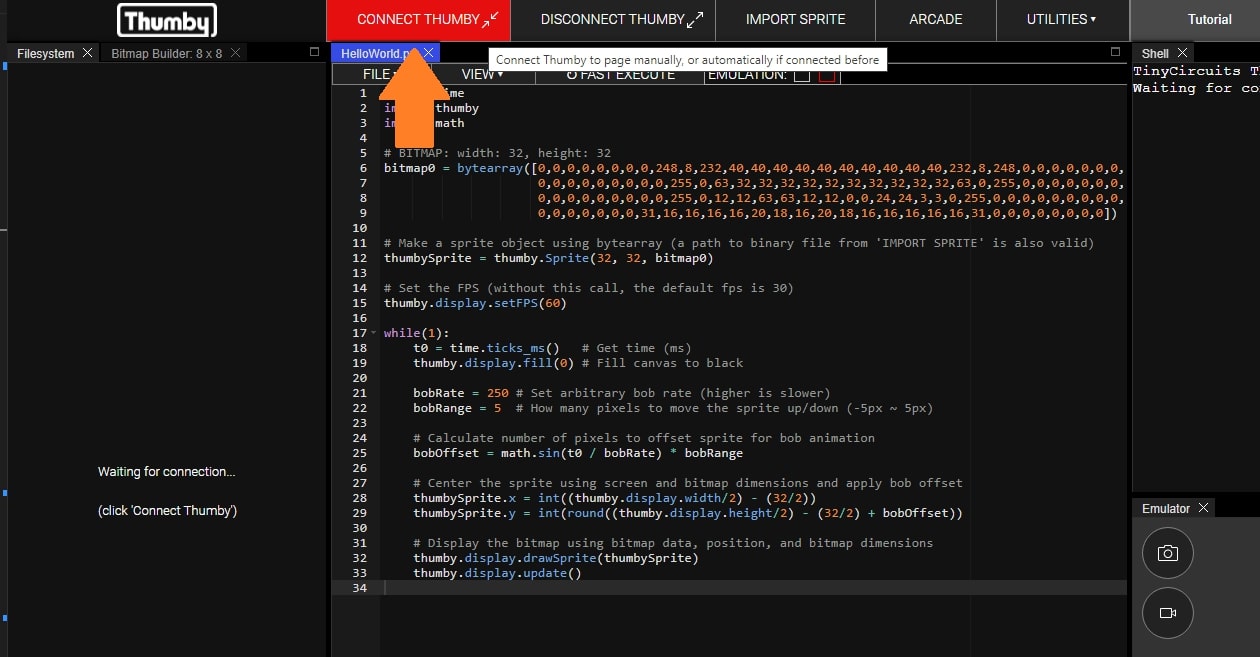
Image source: Thumby
How to Escape the Cable Trap
If the device still doesn't appear, you might be caught in the "Cable Trap." Many modern USB-C cables are designed for high-wattage charging but have poor shielding for low-speed serial data. Community wisdom suggests that older digital camera cables or cables from reputable brands like Anker are exceptionally strong choices for this task.
On Windows, you can verify the connection by opening Device Manager . Look under "Ports (COM & LPT)." A correctly connected Thumby should appear as a "USB Serial Device (COMx)." If you see "Unknown Device" or nothing at all, the issue is almost certainly the physical cable or the port itself.
Navigating the Editor Interface
The Thumby Code Editor is a robust environment that balances simplicity for beginners with depth for experienced coders. It is divided into several key zones: the File Navigator, the Code Area, the Emulator, and the Shell.
Visual Coding with Blockly for Beginners
For those who are new to programming logic, the editor offers Blockly . This is a drag-and-drop interface where you can snap together logic puzzles to create a game. What makes this implementation stand out is that it generates MicroPython code in real-time in a side window. This allows users to see how their visual logic translates into actual syntax, providing a natural bridge to text-based coding.
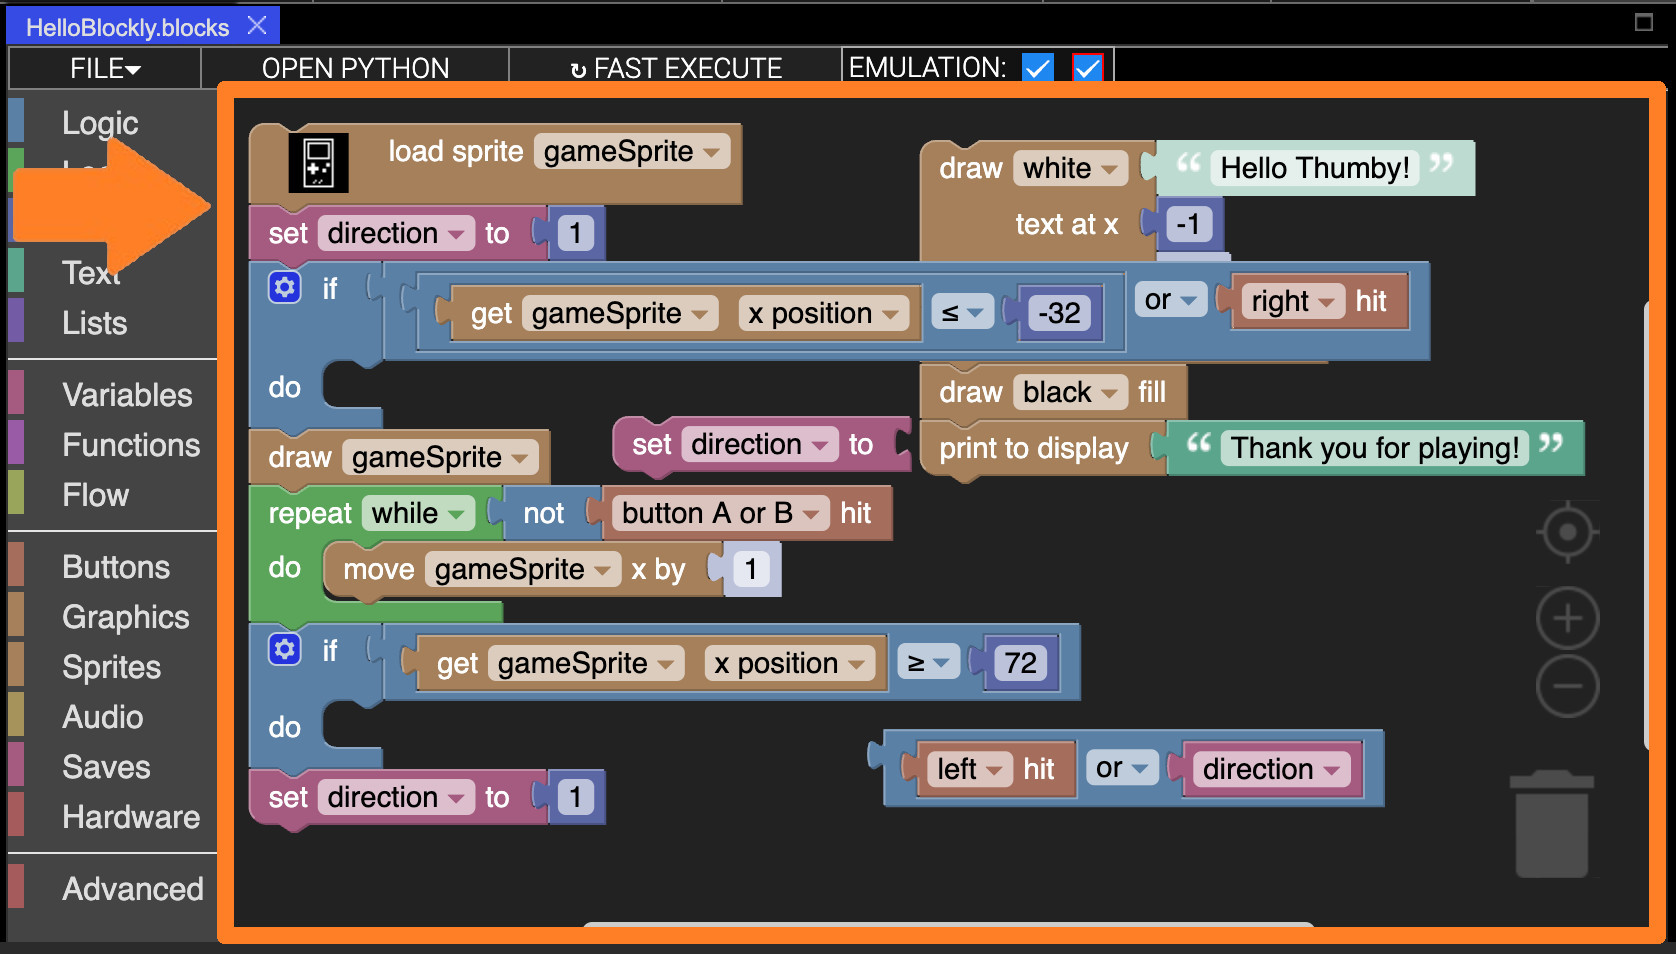
Image source: Thumby
Writing MicroPython in the Text Editor
MicroPython is the primary language for Thumby development. It is a lean implementation of Python 3 optimized to run on microcontrollers. The editor provides syntax highlighting and auto-indentation, which are vital for Python.
When writing for the Thumby, you will primarily interact with the
thumby
library. A basic script to display text looks like this:
import thumby

# Clear the screen
thumby.display.fill(0)
# Draw text at coordinates (x, y)
thumby.display.drawText("Hello!", 0, 0, 1)
# Push the buffer to the physical screen
thumby.display.update()
Testing Games with the Built-in Emulator
One of the most convenient features of the IDE is the built-in emulator. Located on the right side of the screen, it allows you to run your code virtually before sending it to the hardware. This saves wear and tear on the Thumby's Flash memory and speeds up the debugging process. However, keep in mind that the emulator may not perfectly replicate the sound of the piezo speaker or the exact tactile feel of the buttons.
Mastering the Integrated Bitmap Builder
Since the original Thumby screen is only 72x40 pixels and monochrome, creating assets requires a specific approach. You cannot simply drag and drop a JPEG into your code.
How to Create Sprites for a 72x40 Screen
The Bitmap Builder tool, integrated directly into the editor, allows you to draw sprites pixel-by-pixel. You can set the dimensions of your sprite (e.g., 8x8 for a character) and use the pencil tool to toggle pixels on (white) or off (black). This tool is a significant advancement over manual coordinate mapping, which was common in early micro-gaming development.
Exporting Bitmaps Directly into Your Code
Once your drawing is complete, the Bitmap Builder provides a "Copy to Clipboard" function that formats the image as a
byte array
. You can then paste this directly into your MicroPython script. The
thumby.display.blit()
function is then used to render these arrays onto the screen. This workflow is highly efficient, as it eliminates the need for external image conversion software like GIMP or specialized Python scripts.
Programming the New Thumby Color
The release of the Thumby Color introduced a more powerful architecture, shifting from the RP2040 to the Raspberry Pi RP2350 . This change brings new possibilities but also new considerations for the editor.
| Feature | Original Thumby | Thumby Color |
|---|---|---|
| Processor | RP2040 (Dual-core M0+) | RP2350 (Dual-core M33) |
| Display | 72x40 Monochrome OLED | 128x128 16-bit Color TFT |
| Storage | 2MB Flash | 16MB Flash |
| Audio/Haptics | Piezo Speaker | Piezo + Rumble Motor |
Key Differences in the RP2350 Architecture
The jump to 16MB of storage and a color screen means your games can be significantly larger and more visually complex. The Thumby Color IDE supports 16-bit color depth (RGB565), allowing for vibrant graphics. Developers can now use the
thumby.display.drawSprite()
functions with full color palettes, a major step forward from the binary black-and-white constraints of the original model.
Using the Color Legacy Mode
A common concern for users upgrading to the Color model is the fate of their existing library. The Thumby Code Editor includes a Legacy Mode compatibility layer. This allows monochrome games designed for the 72x40 screen to run on the 128x128 color screen. The editor handles the upscaling and coordinate mapping automatically, ensuring that the thousands of community-created games remain playable on the new hardware.
Troubleshooting Platform-Specific Issues
Even with a top-tier editor, OS-specific quirks can interfere with your workflow. Understanding how your operating system handles USB serial devices is key to a smooth experience.
Fixing Connection Problems on Linux
Linux users often face "Permission Denied" errors when trying to connect. This is because the serial ports (
/dev/ttyACM0
or similar) are restricted to the root user and the
dialout
group by default. To fix this, run the following command in your terminal:
sudo adduser $USER dialout
After running this, you must log out and log back in (or restart) for the changes to take effect. Without this step, the Thumby Code Editor will be unable to "see" the device even if it is plugged in correctly.
Resolving Windows Driver Recognition
On Windows 10 and 11, the Thumby should use the generic USB Serial driver. However, if you have previously used the port for other microcontrollers (like Arduinos or ESP32s), there might be a driver conflict. If the WebSerial prompt doesn't appear, try the
"Refresh while Plugged In"
trick: keep the Thumby connected and powered on, then hit
F5
to refresh the editor page. This often forces the browser to re-scan the available COM ports.
Advanced Workflow and Data Safety
As you become more comfortable with the editor, you will likely want to manage larger projects or even move beyond the web-based environment.
Updating MicroPython Safely
TinyCircuits occasionally releases updates to the MicroPython firmware to add features or fix bugs. The editor will prompt you when an update is available. Warning: Updating the firmware can sometimes format the internal filesystem, erasing your saved games and code.
Always use the
Filesystem Manager
in the editor to download your
.py
files to your computer before proceeding with a firmware flash. Think of your PC as the primary storage and the Thumby as the "deployment" target.
Moving to Arduino C++ for Power Users
While MicroPython is excellent for most games, it does have overhead. For developers pushing the limits of the RP2350—such as implementing 3D raycasting or complex physics engines—the Arduino IDE is a strong alternative. By using C++, you can bypass the Python interpreter and write directly to the hardware. This is generally reserved for advanced users, as it lacks the instant "Fast Upload" convenience of the web editor.
Frequently Asked Questions
Why does the editor say "No compatible devices found"?
This is usually caused by one of three things: using an unsupported browser (like Firefox), using a charging-only USB cable that lacks data lines, or the device being turned off. Ensure you are using Chrome or Edge, verify your cable with another device, and make sure the Thumby's power switch is in the 'ON' position before clicking connect.
Can I save my code to the cloud in the Thumby Editor?
The editor primarily uses local web storage to keep your files active between sessions. However, this is not a permanent cloud backup. If you clear your browser cache or "Hard Reset" the page, you could lose your work. It is highly recommended to manually download your scripts to your computer using the "Download" button in the file menu regularly.
Does the Thumby Code Editor work offline?
The editor is designed as a Progressive Web App (PWA). Once you have loaded the page while online, many of its features will continue to work offline if your browser has cached the assets. However, for the most reliable experience and to access the latest library updates, an active internet connection is preferred during the initial setup.
How do I delete games to make room for new ones?
In the File Navigator on the left side of the editor, you can see all files currently stored on the Thumby's Flash memory. Right-clicking a file will give you the option to delete it. Be careful not to delete system files like
main.py
unless you intend to replace them, as this is the file the Thumby looks for first when booting up.
What is the difference between code.thumby.us and arcade.thumby.us?
code.thumby.us
is the primary development environment meant for writing and debugging your own games.
arcade.thumby.us
is a community hub where you can browse, play, and download games created by other users. Both interfaces look similar, but the Arcade is focused on consumption and community sharing rather than pure development.
Key Takeaways for Thumby Developers
Mastering the Thumby Code Editor is the first step toward creating your own portable gaming experiences. Here are the essential points to remember:
- Browser Choice: Always use Google Chrome or Microsoft Edge to ensure WebSerial compatibility.
- Cable Quality: Verify that you are using a data-capable USB cable ; charging-only cables are the most common cause of connection failure.
- Connection Protocol: Use the "Connect-then-Power" sequence to help the browser identify the RP2040/RP2350 chip reliably.
- Asset Creation: Utilize the integrated Bitmap Builder to create and export monochrome or color sprites directly into your code.
- Data Safety: Regularly back up your files to your local PC, especially before performing MicroPython firmware updates.
- Platform Differences: Be aware of the resolution and storage jumps when moving from the original Thumby to the Thumby Color.
Start by opening the editor and running the "Hello World" script to confirm your hardware is ready for your first big project.