Home
Home
How to Set Up and Use the Arduino Web Editor to Code Anywhere
The landscape of microcontroller programming has shifted from local installations to flexible, cloud-based environments. The Arduino Web Editor , a core component of the Arduino Cloud ecosystem, allows developers to write code, manage libraries, and upload sketches directly through a web browser. This eliminates the need for manual software updates and ensures your projects are accessible from any computer with an internet connection.
To use the Arduino Web Editor, you must first create an Arduino Cloud account and install the Arduino Cloud Agent . This small background application acts as a bridge between your browser and your USB ports. Once connected, you can select your board from the dropdown menu and click "Upload" to send code to your hardware. It is widely considered a top choice for Chromebook users and students who cannot install traditional desktop software.
What Is the Arduino Web Editor and How Does It Work?
The Arduino Web Editor is a browser-based Integrated Development Environment (IDE) that mirrors the functionality of the classic desktop application while adding cloud-specific benefits. It is hosted within Arduino Create , a suite of tools designed to streamline the Internet of Things (IoT) development process. Unlike the desktop version, the Web Editor stores all your sketches in the cloud, providing an automatic backup system that prevents data loss.
One of the most significant advantages of this platform is its handling of libraries. In a traditional setup, users must manually search for, download, and update libraries. The Web Editor includes over 5,000 pre-installed libraries , which are automatically indexed and kept up to date by the Arduino team. This ensures that when you include a standard header file, the compiler already has the correct version ready to go.
Technically, the editor functions through a WebSocket connection . When you write code in the browser, the compilation happens on Arduino's high-performance servers. Once the binary file is ready, it is sent back to your computer. The Arduino Cloud Agent then takes that binary and pushes it through your USB port to the microcontroller. This hybrid approach combines the processing power of the cloud with the physical connectivity of your local machine.
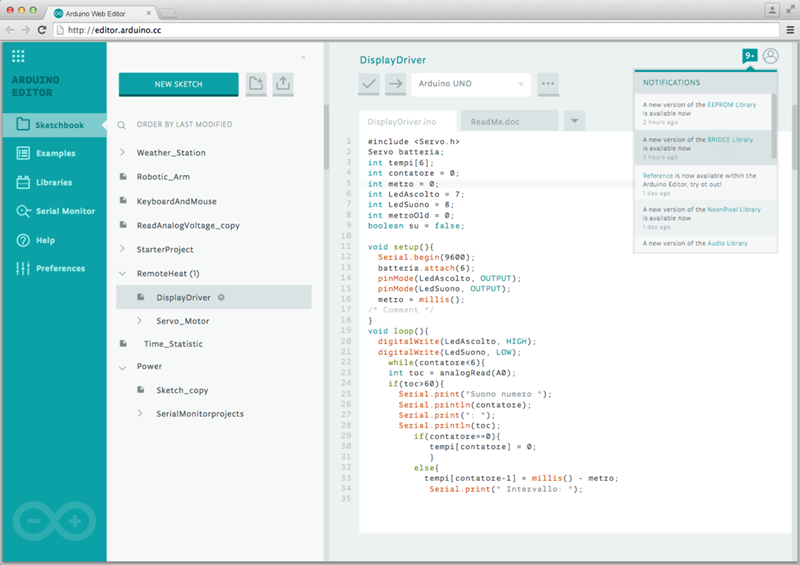
Image source: AWS
How to Set Up the Arduino Web Editor in 5 Minutes
Setting up the web-based environment is a straightforward process, but it requires a few specific steps to ensure your hardware can communicate with the browser. Follow this sequence to get started:
- Create Your Arduino Cloud Account: Visit the official Arduino Cloud page and sign up. You can use a dedicated email or link your Google, GitHub, or Apple account for faster access.
- Install the Arduino Cloud Agent: This is the most critical step. The browser cannot talk to your USB ports directly due to security restrictions. Download the Agent for Windows, macOS, or Linux. During installation, you may be asked to trust a driver certificate; accept this to allow the bridge to function.
- Verify the Agent Connection: Look for the Arduino icon in your system tray (Windows) or menu bar (macOS). If it is gray, the agent is inactive; if it is teal, you are ready to go. You can right-click the icon to "Open Console" and see real-time logs of the connection status.
- Select Your Board and Port: Connect your Arduino board via USB. In the Web Editor, look at the top dropdown menu. It should automatically detect your board (e.g., "Arduino Uno on COM3"). If it shows "Unknown," you may need to manually select the board type from the list.
-
Write and Upload Your First Sketch:
Open the "Examples" tab, select
01.Basics > Blink, and click the checkmark icon to verify the code. Once verified, click the right-arrow icon to upload. If the onboard LED starts flashing, your setup is successful.
Arduino Web Editor vs. Desktop IDE — Which Should You Choose?
Choosing between the Web Editor and the Desktop IDE 2.0 depends largely on your workflow and hardware requirements. While the Web Editor ranks among the top options for portability, the Desktop IDE remains a strong contender for professional, offline development.
| Feature | Arduino Web Editor | Desktop IDE 2.0 |
|---|---|---|
| Internet Required | Yes (Always) | No (Offline capable) |
| Library Management | Automatic (5,000+ pre-installed) | Manual (User-controlled) |
| Cloud Sync | Automatic backups | Manual / Local only |
| AI Assistant | Integrated (50 free msgs/mo) | Limited / Plugin-based |
| Hardware Debugging | Not supported | Supported (with compatible probes) |
| Third-Party Boards | Supported via Cloud Agent | Full support via Board Manager |
When to Use the Web Editor
The Web Editor is an excellent choice for educational settings . Because it requires no local installation of heavy software or library files, it is the primary method for coding on Chromebooks. It is also ideal for hobbyists who move between multiple computers, as your code follows your account rather than staying on a single hard drive.
When to Stick to the Desktop IDE
If you are working in a location with unreliable internet, the Desktop IDE is essential. Furthermore, professional engineers often prefer the Desktop IDE for its integrated debugger , which allows for real-time variable monitoring and breakpoints. If your project requires highly specific, older versions of libraries that might conflict with the "latest-only" approach of the cloud, the local IDE provides the granular control you need.
How to Use the New AI Assistant for Faster Coding
In recent updates, Arduino has integrated a notably innovative AI Assistant directly into the Web Editor. This tool acts as a pair programmer, helping you write boilerplate code, explain complex functions, and debug compilation errors in real-time. According to Arduino Cloud documentation , users on the free tier receive 50 free messages per month , while paid subscribers have higher limits.
To access the AI Assistant, look for the chat icon in the right-hand sidebar of the editor. You can highlight a section of code and ask the AI to "Optimize this loop" or "Add comments to this function." It is particularly effective at identifying missing semicolons or mismatched braces—errors that often frustrate beginners.
While the AI is a significant step forward, it is important to verify the code it generates. AI models can occasionally suggest libraries that are deprecated or use pin assignments that conflict with your specific hardware layout. Always use the "Verify" button after implementing AI-suggested changes.
Using the Arduino Web Editor on Chromebooks and Tablets
Chromebooks have become a staple in STEM education, but their locked-down operating systems often prevent the installation of standard .exe or .dmg files. The Arduino Web Editor solves this problem by running entirely in the browser. For the best experience on ChromeOS, users should install the Arduino Cloud app from the Google Play Store, which simplifies the USB communication process.
On tablets, the experience is more nuanced. While you can log in and write code on an iPad or Android tablet, USB-OTG (On-The-Go) support for uploading code is often limited by the mobile browser's permissions. For these devices, the Web Editor is primarily a tool for reviewing and editing code rather than deploying it to hardware. If you must program from a tablet, consider using an ESP32 or Arduino board with Over-The-Air (OTA) update capabilities, which allows you to send code via Wi-Fi instead of a physical cable.
Image source: Hackster.io
Troubleshooting Common Arduino Web Editor Errors
Even with its streamlined design, users may encounter technical hurdles. Based on community wisdom from the Arduino forums, here are the most frequent issues and their fixes:
The "Space in Filename" Bug
A common pitfall that is not always documented in basic guides is the
filename restriction
. Currently, the Web Editor may fail to compile or verify sketches if the filename contains spaces (e.g.,
My Project.ino
). To resolve this, always use underscores or CamelCase (e.g.,
My_Project.ino
or
MyProject.ino
). This simple change often fixes "Internal Server Error" messages during compilation.
ESP32 and ESP8266 Detection Issues
While the Web Editor supports third-party boards, the Cloud Agent sometimes struggles to recognize ESP32 modules. If your board isn't appearing, ensure you have the correct CP210x or CH340 drivers installed on your computer. If the board is recognized by your OS but not the browser, try refreshing the Agent by right-clicking the tray icon and selecting "Restart Agent."
Recovering Lost Code from Sync Conflicts
If you use both the Desktop IDE 2.0 and the Web Editor, you might encounter a sync conflict where your latest changes seem to disappear. If this happens, do not panic. The Cloud Agent often stores a local cache of your work. On Windows, check the following directory for temporary files:
C:\Users\<username>\AppData\Local\Temp\arduino\sketches\
Searching this folder can often help you recover code that failed to sync to the cloud during an internet outage.
Power User Tips for the Arduino Web Editor
To truly master the online environment, you should take advantage of hidden features that improve productivity and data analysis.
Customizing the UI with the Command Palette
Many users find the default hover popups and parameter hints distracting. You can customize these settings by pressing
Ctrl+Shift+P
to open the
Command Palette
. From here, you can search for settings like
editor.parameterHints.enabled
and toggle them off. This level of UI control is rarely mentioned in basic tutorials but is highly valued by experienced coders.
Advanced Serial Monitor Features
The web-based Serial Monitor is surprisingly robust. Beyond basic text output, it allows you to:
- Add Timestamps: Essential for debugging timing-sensitive sensor data.
- Change Baud Rates: Adjust the communication speed without re-uploading the sketch.
-
Download as CSV:
This is a standout feature. You can log data from your sensors and then click the "Download" button to save the entire session as a
.csvfile, which can be opened directly in Excel or Google Sheets for graphing.
Managing Custom Libraries
While the 5,000+ pre-indexed libraries cover most needs, you may occasionally need a custom or private library. The Web Editor allows you to import .zip libraries . Simply go to the Libraries tab, click the "Import" button, and upload your file. These custom libraries are then stored in your private cloud storage and are available across all your devices.
Frequently Asked Questions
Is the Arduino Web Editor free to use?
Yes, there is a generous free tier that includes access to the Web Editor, cloud storage for your sketches, and 50 free AI Assistant messages per month. However, for advanced IoT features like "Cloud Variables" or increased AI usage, Arduino offers paid subscription plans. The free version is more than sufficient for most hobbyist and educational projects.
Can I use the Arduino Web Editor without an internet connection?
No, the Web Editor is a cloud-based tool that requires an active internet connection to compile and upload code. The compilation process happens on remote servers, not on your local machine. If you need to work offline, you should download and install the Arduino Desktop IDE 2.0, which allows for fully local development.
Does the Web Editor support third-party boards like ESP8266 or Teensy?
Yes, the Web Editor supports a wide range of third-party boards. As long as the Arduino Cloud Agent is running on your computer, it can handle the communication for most popular microcontrollers. You may need to select the specific board type from the "Select Board" menu if it is not automatically detected by the system.
How do I share my code with others using the Web Editor?
Sharing is one of the platform's strongest features. Each sketch has a unique URL. You can click the "Share" button to generate a link that you can send to collaborators. While it doesn't currently support Google Docs-style real-time editing, the recipient can view your code and "Save a Copy" to their own account for further modification.
Is my code secure when stored in the Arduino Cloud?
Arduino uses industry-standard encryption to protect your data. Your sketches are private by default and are only accessible to you unless you choose to share the link. The automatic backup system provides a layer of security against local hardware failure, ensuring your work is preserved even if your computer crashes.
Key Takeaways for Arduino Web Users
- Install the Cloud Agent first to bridge the gap between your browser and USB hardware.
- Avoid spaces in filenames to prevent common compilation and verification errors.
- Leverage the pre-installed libraries to save time on manual downloads and updates.
- Use the Serial Monitor's CSV export for easy data logging and analysis in external tools.
- Check the local Temp folder if you experience a sync conflict between web and desktop versions.
- Utilize the AI Assistant for quick debugging and boilerplate code generation.
- Choose the Web Editor for portability and the Desktop IDE for advanced hardware debugging.
Start by connecting your board and running the Blink example to confirm your Cloud Agent is communicating correctly.
All trademarks, copyrighted content, and quoted material referenced in this article belong to their respective owners. Brief excerpts are used under fair use (17 U.S.C. § 107) for purposes of commentary, criticism, and informational reporting. This article is not affiliated with or endorsed by Arduino SA.