Home
Home
How to Set Up and Optimize Your Focusrite Scarlett Solo for Professional Audio
To get started with your Scarlett Solo, connect it to your computer via the included USB-C cable. For Windows users, download Focusrite Control 2 to install the necessary ASIO drivers. On macOS, the device is class-compliant and works immediately. To record, ensure your DAW track is set to Mono (Input 1) to avoid the common "left-ear only" audio issue. Aim for the gain halos to stay Green , peaking occasionally in Amber .
The Focusrite Scarlett Solo stands out as a top choice for singer-songwriters, podcasters, and home producers. Whether you are using the widely acclaimed 3rd Generation model or the significantly advanced 4th Generation unit, understanding the hardware nuances is the first step toward capturing studio-quality sound. This guide provides a deep dive into the configuration, optimization, and troubleshooting of your interface to ensure a seamless recording experience.
What Comes in the Box and What Do the Buttons Do?
Upon unboxing your Scarlett Solo, you will find the interface itself and a USB-C to USB-A (or USB-C to USB-C) cable. The hardware is designed for simplicity, but each control serves a specific technical purpose that impacts your signal chain.
+57dB Gain Range
The 4th Gen preamps offer a significant advancement in gain, allowing you to drive dynamic microphones like the Shure SM7B without necessarily needing an external booster.
Air Mode
Inspired by the classic Focusrite ISA transformer, this button adds high-end detail and presence to vocals and acoustic instruments.
Dynamic Sensor Halos
Redesigned for the latest generation, these provide more granular feedback on your input levels compared to the 3rd Gen rings.
Front Panel Anatomy and Controls
- XLR Input: Located on the front (3rd Gen) or back (4th Gen), this is for your microphone. It utilizes the Scarlett's high-quality preamp.
- 1/4" Instrument/Line Input: Used for guitars, basses, or synthesizers.
- The "INST" Button: This is critical. When engaged, it changes the impedance of the 1/4" jack to accommodate high-impedance (Hi-Z) instruments like electric guitars. Without this, your guitar may sound thin or muffled.
- 48V Phantom Power: Required for condenser microphones. Expert Tip: According to official Focusrite documentation , you should always plug your microphone in before engaging 48V to prevent electrical pops that could damage your equipment.
| Feature | Scarlett Solo 3rd Gen | Scarlett Solo 4th Gen |
|---|---|---|
| Gain Range | +56dB | +57dB |
| Dynamic Range | 111dB | 120dB |
| Air Mode | Analog Presence | Presence + Harmonic Drive |
| Headphone Jack | Front Panel | Front Panel (Independent Control) |
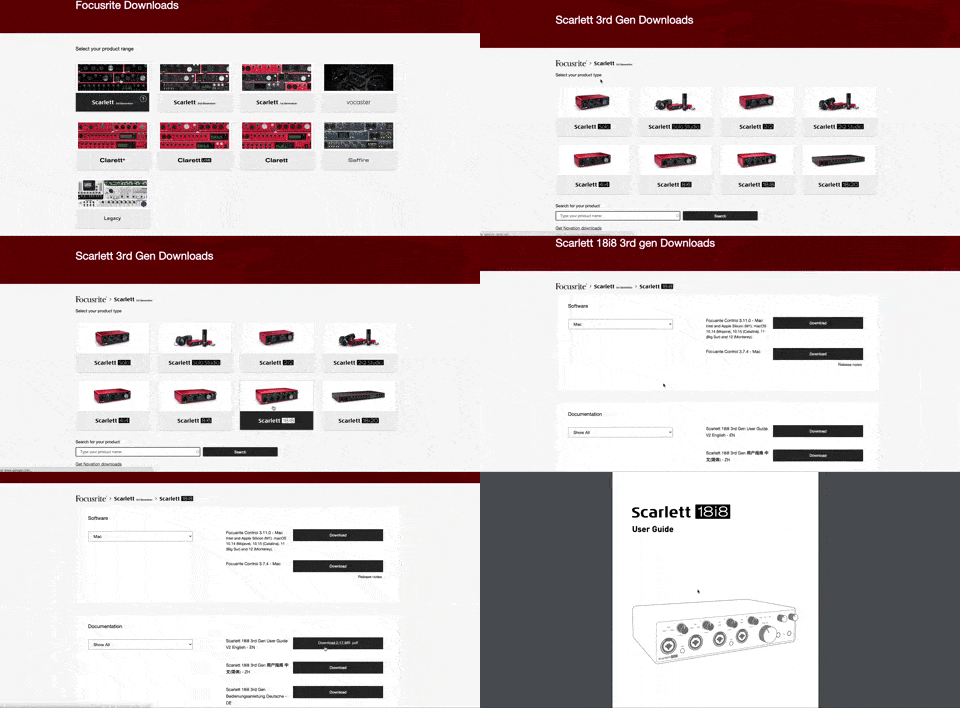
Image source: Focusrite
How to Install Scarlett Solo Drivers on Windows 11 and macOS
The installation process differs significantly between operating systems. While Focusrite provides an "Easy Start" tool that appears as a virtual drive when you first plug in the device, many users find a manual installation more reliable, especially on modern Windows systems.
The Windows 11 Survival Guide
Windows 11 users occasionally report driver recognition failures or "code 10" errors. This often occurs when upgrading from Windows 10 without purging old drivers. To ensure stability, follow the clean install method:
- Disconnect the Solo: Unplug the USB cable before starting the software installation.
- Download Focusrite Control 2: Visit the Focusrite Help Center to get the latest version of Focusrite Control 2 (for 4th Gen) or Focusrite Control (for 3rd Gen).
- Run the Installer: Follow the prompts and restart your computer when finished. This installs the essential ASIO drivers that allow your DAW to communicate with the hardware at low latency.
- Connect and Update: Plug in the Solo. Focusrite Control will likely prompt you for a firmware update. Do not disconnect the device during this process.
macOS Installation
On macOS, the Scarlett Solo is "Class Compliant." This means you do not strictly need to install a driver for the device to work. However, installing Focusrite Control is still highly recommended as it allows you to manage firmware updates and access internal routing features like Loopback.
How to Configure Your Scarlett Solo in Your Recording Software
Once the drivers are installed, you must tell your Digital Audio Workstation (DAW) to use the Scarlett as its primary audio engine. Whether you use Ableton Live Lite (included with the Solo), FL Studio, or Audacity, the logic remains the same.
Selecting the Audio Device
Navigate to your DAW's Preferences or Settings menu. Look for the "Audio" tab. On Windows, ensure the "Driver Type" is set to ASIO and the "Audio Device" is set to Focusrite USB ASIO . On Mac, select "Scarlett Solo" as both the Input and Output device.
The "Left-Ear Only" Fix
One of the most frequent complaints from new users is that their voice only comes out of the left speaker or headphone. This is not a hardware defect; it is a routing configuration issue. The Scarlett Solo sends the Microphone (Input 1) to the left channel and the Instrument (Input 2) to the right channel of a stereo signal.
Sample Rate and Buffer Size
For most home recordings, a Sample Rate of 48kHz and a Bit Depth of 24-bit provide an excellent balance of quality and file size. The Buffer Size controls latency (the delay between speaking and hearing yourself). A lower buffer (e.g., 128 or 256 samples) is better for recording, while a higher buffer (1024 samples) is better for mixing when your computer needs more processing power.
How to Get the Perfect Gain Level Without Clipping
Gain staging is the process of ensuring your signal is loud enough to be clear but quiet enough to avoid digital distortion (clipping). The Scarlett Solo makes this easy with its "Gain Halos."
Reading the Gain Halos
- Green: Your signal is at a healthy level. This is where you want to stay most of the time.
- Amber: Your signal is getting "hot." This is acceptable for occasional peaks, but you are close to the limit.
- Red: You are clipping. The audio will sound distorted and "crunchy." Immediately turn the gain knob counter-clockwise.
When setting gain for a vocal, perform your loudest section and adjust the knob until the halo stays green with occasional amber flashes. For the 4th Gen model, you can utilize the +57dB of gain to get a clean signal even from low-output dynamic mics, though a dedicated preamp booster may still be a popular choice for extremely quiet sources.
Direct Monitor Function
If you experience a distracting delay in your headphones while recording, engage the Direct Monitor switch. This routes the input signal directly to your headphones before it travels to the computer, providing zero-latency monitoring. On the 4th Gen, you can even toggle between mono and stereo monitoring to hear how your inputs sit in the soundstage.
Advanced Settings for Podcasting Gaming and Streaming
The Scarlett Solo is not just for music; it is an exceptionally strong tool for content creators. Features like Loopback have made it a favorite for streamers.
Using Loopback
Loopback allows you to "loop" audio from your computer (like a YouTube video, game sound, or a guest on Zoom) back into your recording software or streaming app (like OBS). In Focusrite Control 2, you can see the Loopback inputs. In OBS, you would add a new Audio Input Capture and select the Loopback channels. This eliminates the need for complex virtual cables or secondary mixers.
Gaming and Discord Setup
To use the Solo for gaming, set it as your default device in Windows:
- Right-click the speaker icon in your taskbar and select Sound Settings .
- Set "Input" to Focusrite USB .
- In Discord, go to User Settings > Voice & Video and ensure the Input Device is set to the Scarlett Solo. Note: Turn off "Automatically determine input sensitivity" and manually set the threshold to ensure your voice isn't cut off by Discord's noise suppression.
Optimizing Your Computer for Flawless Audio Performance
Audio processing is resource-intensive. Even with a top-tier interface, a poorly optimized computer can cause "pops," "clicks," or dropouts. Follow these steps to prioritize audio tasks.
Disable USB Selective Suspend
Windows has a power-saving feature that can "put to sleep" USB ports it thinks are idle. This often causes the Scarlett Solo to disconnect mid-session. To disable it:
- Open Control Panel > Power Options .
- Click Change plan settings next to your active plan.
- Click Change advanced power settings .
- Find USB settings > USB selective suspend setting and set it to Disabled .
Prioritize Background Services
Audio drivers run as background services. You can tell Windows to give these services more CPU priority:
- Right-click "This PC" and select Properties > Advanced System Settings .
- Under the Advanced tab, click Settings in the Performance section.
- Go to the Advanced tab and select Background services under "Adjust for best performance of:".
Troubleshooting Common Scarlett Solo Issues
Even with a perfect setup, technical hurdles can arise. Here are the most common solutions sourced from community wisdom and technical support logs.
Clicking or Popping Sounds
This is usually caused by a buffer size that is too low for your CPU to handle. Increase the buffer size in Focusrite Control or your DAW settings. Also, ensure you are using the original USB cable.
Interface Not Recognized
Try a different USB port. If you are on a laptop, ensure it is plugged into a power outlet. Some laptops throttle USB power when running on battery, which can starve the Solo of the current it needs.
No Sound in Headphones
Check the Monitor knob (it controls both speakers and headphones on the Solo). Ensure Direct Monitor is on if you want to hear the input, or check that your DAW's output is routed to "Output 1-2".
Frequently Asked Questions
- Does the Scarlett Solo 4th Gen need an external power supply?
- No, the Scarlett Solo is designed to be bus-powered via USB. However, it requires a high-current USB port (500mA or more). If you are using an older laptop or a mobile device like an iPad, you might need a powered USB hub to provide sufficient energy.
- Can I record a guitar and a microphone at the same time?
- Yes. The Scarlett Solo is a 2-in, 2-out interface. You can plug a microphone into Input 1 and a guitar into Input 2 and record them to separate tracks simultaneously in your DAW.
- What is the difference between Air mode on 3rd and 4th Gen?
- While both generations offer a presence boost, the 4th Gen Air mode is notably innovative, adding a "Harmonic Drive" stage that emulates the subtle saturation of a high-end console preamp, providing a richer sound than the 3rd Gen's purely analog filter.
- Why is my gain halo flashing red even when I'm not loud?
- This could indicate a "hot" signal coming from an active instrument or a line-level device plugged into the instrument jack without the proper padding. Ensure the "INST" button is toggled correctly for your source.
- Do I need Focusrite Control for the Solo to work?
- While the device is class-compliant on Mac, Focusrite Control is highly recommended for all users. It is the only way to update firmware, toggle certain hardware settings, and manage the Loopback feature for streaming.
Final Checklist for a Perfect Recording Session
Before you hit the record button, run through this distilled checklist to ensure your technical setup is optimized for the best possible audio quality.
- Hardware First: Connect your microphone and instruments before turning on the interface or engaging 48V phantom power.
- Mono Routing: Ensure your vocal track in the DAW is set to Mono Input 1 to avoid the left-ear-only audio trap.
- Gain Staging: Test your loudest peak; the gain halo should stay Green and never turn Red .
- Latency Control: Use Direct Monitor for zero-latency tracking and set your DAW buffer to 128 or 256 samples.
- Power Stability: Disable USB Selective Suspend in your Windows power settings to prevent random disconnects.
- Software Check: Confirm that Focusrite USB ASIO is selected as the active driver in your DAW preferences.
By following these steps, you can focus on your creativity rather than troubleshooting technical glitches.
All trademarks, copyrighted content, and quoted material referenced in this article belong to their respective owners. Brief excerpts are used under fair use (17 U.S.C. § 107) for purposes of commentary, criticism, and informational reporting. This article is not affiliated with or endorsed by Focusrite Audio Engineering Ltd.