Home
Home
How to Use the DaVinci Resolve AI Music Editor to Retime Your Audio
The DaVinci Resolve AI Music Editor is a Studio-exclusive tool introduced in version 20 that uses the DaVinci Neural Engine to intelligently retime music tracks. Unlike traditional stretching, it analyzes the song's structure to create seamless cuts, extending or shortening audio to a specific duration without affecting pitch or tempo. To access it, select an audio-only clip and navigate to the Inspector > Audio Tab .
For years, video editors have faced the tedious task of manually cutting music to fit a specific scene length. Whether you were performing "surgical" edits on the beat or using basic crossfades, the process was time-consuming and often resulted in jarring transitions. With the release of DaVinci Resolve 20 , Blackmagic Design has introduced a notably innovative solution: the AI Music Editor.
This tool represents a significant advancement in the Fairlight and Edit pages, allowing users to input a target duration and let the software handle the structural rearrangement. By identifying beats, verses, and choruses, the DaVinci Neural Engine generates multiple variations of a song that sound as if they were originally composed for your specific timeline length. In this guide, we will explore how to master this feature, troubleshoot common visibility issues, and apply power-user techniques to ensure your audio transitions remain professional.
Where Is the AI Music Editor in DaVinci Resolve 20?
One of the most common points of friction for users is simply locating the tool. Unlike some AI features that have dedicated floating windows, the AI Music Editor is integrated directly into the standard workflow panels. It is available on both the Edit Page and the Fairlight Page , ensuring that you can retime your music regardless of which stage of the post-production process you are in.
To find the tool, follow these steps:
- Open your project and navigate to the Edit or Fairlight page.
- Select the music clip you wish to edit on your timeline.
- Open the Inspector panel (usually located in the top right corner of the interface).
- Click on the Audio tab within the Inspector.
- Scroll down until you see the section labeled AI Music Editor .
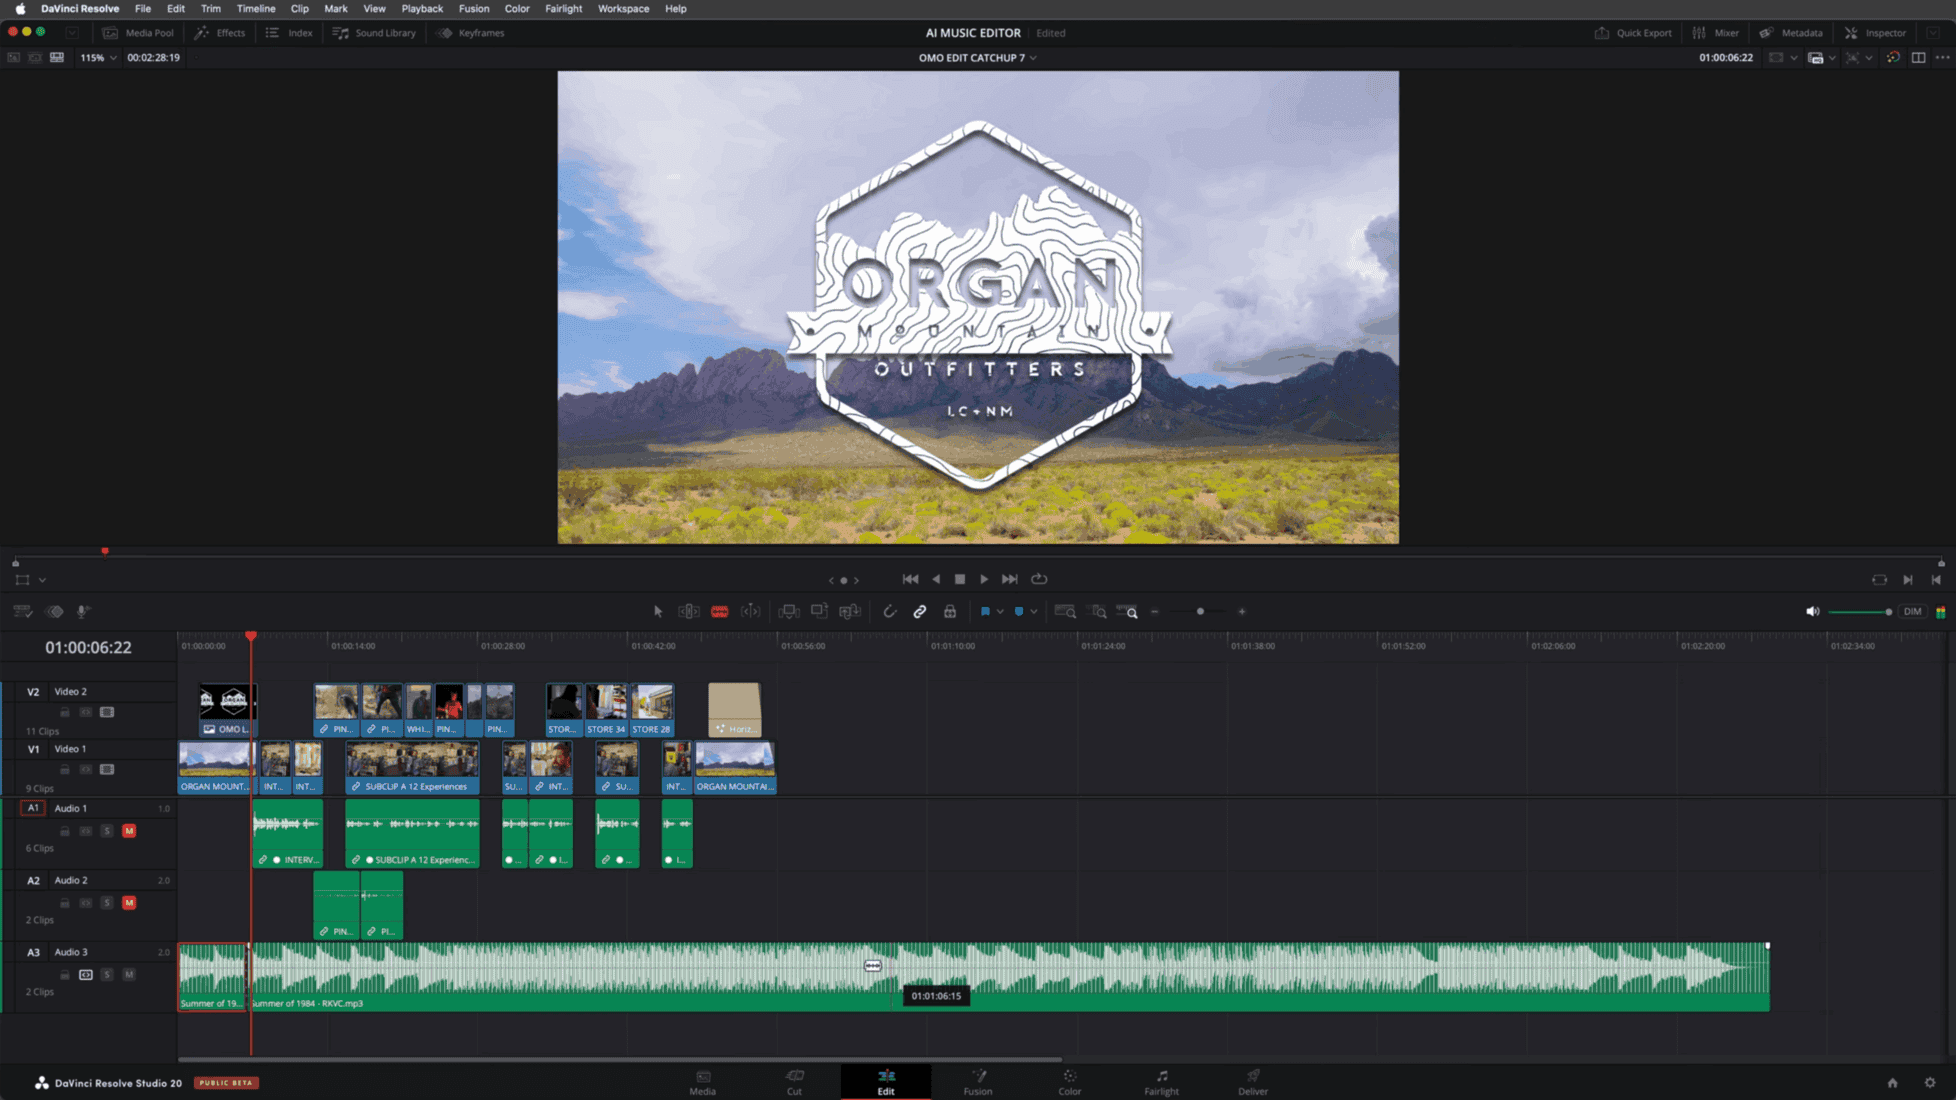
Image source: Stark Insider
If you do not see this section, it is likely due to one of three reasons: you are using the free version of Resolve, your software is not updated to version 20, or the clip you have selected does not meet the specific "audio-only" requirements. We will address these troubleshooting steps in detail later in this article.
How to Automatically Shorten or Extend Music Clips
The workflow for retiming music is designed to be straightforward, yet it offers enough flexibility for professional refinement. The tool does not just "stretch" the audio; it performs a structural analysis to find the most logical places to add or remove segments of the song.
- Import and Select Your Track: Drag your music file (WAV, MP3, or AIFF) onto the timeline. Ensure the clip is selected so its properties appear in the Inspector.
- Set Your Target Length: In the AI Music Editor section of the Inspector, you will see a field for Target Length . Enter the exact duration you need in the HH:MM:SS:FF (Hours:Minutes:Seconds:Frames) format. For example, if your scene is exactly 30 seconds long, enter 00:00:30:00.
- Initiate the Analysis: Click the Analyze button. At this point, the DaVinci Neural Engine will scan the waveform to identify transients, rhythmic patterns, and melodic shifts. This process typically takes only a few seconds, depending on the length of the original file and your GPU performance.
- Choose Your Version: Once the analysis is complete, Resolve will present you with four numbered buttons (1, 2, 3, and 4). Each button represents a different structural interpretation of the song at that target length. One version might prioritize keeping the chorus intact, while another might focus on a smoother transition between the intro and outro.
- Finalize with Live Trimming: If the AI-generated length is slightly off or if you want to make minor adjustments, you can use the handles on the timeline clip. The AI will dynamically update the internal cuts as you drag the edge of the clip, a feature known as "Live Trim."
Version 1
Typically prioritizes the original song structure and main hooks.
Version 2
Often focuses on a more percussive or rhythmic flow.
Version 3
May utilize more aggressive cuts to fit tight durations.
Version 4
A balanced alternative that often works well for ambient tracks.
Why Is the AI Music Editor Missing from My Inspector Panel?
Even for users who have upgraded to the latest version, the AI Music Editor can sometimes appear to be "missing." This is rarely a bug and is usually a result of how Resolve handles different types of media containers. According to reports on the Blackmagic Design Forum , several specific conditions must be met for the tool to activate.
The Audio-Only File Requirement You Might Be Missing
The most frequent cause for the missing tab is the "Video-Audio Link" trap. The AI Music Editor is currently optimized for standalone audio files. If you are trying to use the tool on an audio track that was imported as part of a video file (such as an MP4 or MOV), the tab will not appear—even if you have unlinked the audio from the video in the timeline.
The Fix: To bypass this, you must treat the audio as a separate entity. Right-click the audio clip on your timeline and select "Bounce Audio to New Layer" or "Export Audio" as a high-quality WAV file, then re-import it. Once Resolve recognizes the file as a standalone audio asset, the AI Music Editor section should immediately populate in the Inspector.
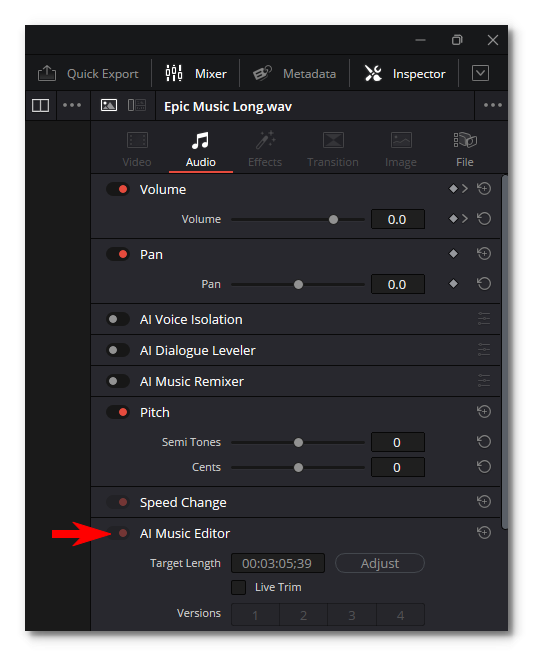
Image source: Blackmagic Forum - Blackmagic Design
Is the AI Music Editor Available in the Free Version?
There has been some confusion regarding the availability of this tool in the free version of DaVinci Resolve. While Blackmagic Design offers an incredibly robust free tier, the AI Music Editor is a Studio-exclusive feature . It relies heavily on the DaVinci Neural Engine, which is the proprietary AI architecture reserved for the paid version of the software. If you are using the free version, the Inspector will simply omit this section entirely.
Fixing Neural Engine Registration Issues
In rare cases, users with a valid Studio 20 license still cannot find the tool. This often happens if the Neural Engine components failed to register correctly during the installation process. If you have verified that you are using a standalone audio file and a Studio license, the most effective solution is a clean reinstall. Ensure you back up your database, uninstall Resolve completely, and download the latest build directly from the Blackmagic support page to ensure all AI libraries are correctly initialized.
How Does It Compare to Adobe Premiere Pro Remix?
For editors coming from the Adobe ecosystem, the AI Music Editor is the direct competitor to Premiere Pro’s "Remix" tool. While both serve the same purpose, their implementation and user control differ significantly. Premiere's Remix tool is widely regarded as a top-tier option for speed, but Resolve's implementation offers a different level of structural variety.
| Feature | DaVinci Resolve AI Music Editor | Adobe Premiere Pro Remix |
|---|---|---|
| UI Trigger | Inspector-based duration entry | Tool-based timeline dragging |
| Variations | 4 distinct structural versions | Slider-based segment density |
| Manual Control | Decompose to original elements | Hidden cuts (requires manual expansion) |
| Engine | DaVinci Neural Engine | Adobe Sensei AI |
Many users find that Premiere’s Remix is slightly faster for "rough and ready" edits because you can simply drag the end of a clip to the desired length. However, DaVinci Resolve stands out for precision. By providing four distinct versions, Resolve allows you to audition different musical arrangements without having to fiddle with sliders. Furthermore, Resolve's ability to "Decompose" the AI edit into its component parts gives professional editors a level of transparency that few competitors match.
Advanced Techniques for Professional Audio Transitions
While the "Analyze and Go" workflow works for many projects, professional audio engineers often require more granular control. The AI Music Editor includes several "hidden" features that allow you to audit and refine the AI's work, ensuring that no listener can tell the song has been manipulated.
Using Decompose to Original Elements for Manual Control
One of the most powerful features of the AI Music Editor is the ability to see exactly what the Neural Engine did. Once you have selected a version you like, you can right-click the clip on the timeline and select "Decompose to Original Elements." This will break the single AI clip into the individual segments and crossfades that the software created.
This is an excellent choice for editors who want to "polish" a transition. If the AI placed a cut in a spot that sounds slightly unnatural, you can manually move the crossfade or adjust the edit point by a few frames. This hybrid workflow—AI for the heavy lifting and human ears for the final 5%—sets a high standard for professional audio editing.
The Rough Cut Optimization Hack for Better Transitions
Expert users have discovered that the AI performs better if you give it a "head start." Instead of asking the AI to turn a 5-minute song into a 30-second clip immediately, try manually trimming the song to within 60 seconds of your target length *before* clicking analyze. By removing the intro or outro manually, you force the Neural Engine to focus its analysis on the most relevant sections of the song, often resulting in more musical and less "choppy" transitions.
Triggering New Results with the Re-Analyze Method
If none of the four versions provided by the AI sound quite right, you aren't necessarily stuck. A common "hack" found in editor forums is the re-analyze trick. Simply change the target duration by a single frame (e.g., from 00:00:30:00 to 00:00:30:01) and click analyze again. This slight change in the mathematical constraint can sometimes trigger the Neural Engine to find a completely different set of edit points, potentially giving you the perfect transition that was missed in the first pass.
Genre Sensitivity and Performance Expectations
It is important to set realistic expectations for what the AI can achieve. The DaVinci Neural Engine relies on identifying clear transients (the sharp peaks in a waveform, like a drum hit) to find logical cut points. Consequently, the tool's effectiveness varies depending on the genre of music you are using.
- Pop, Rock, and EDM: These genres typically have very clear, consistent beats. The AI Music Editor ranks among the top tools for these genres, often producing results that are indistinguishable from a manual edit.
- Orchestral and Cinematic: These tracks can be more challenging due to their fluid tempo and lack of heavy percussion. The AI may struggle to find "clean" cut points, leading to transitions that feel slightly rushed.
- Ambient and Drone: Because these tracks lack clear rhythmic structures, the AI often relies on volume-based crossfades. While usually acceptable, you may need to use the "Decompose" method to smooth out these edits manually.
Frequently Asked Questions
- Does the AI Music Editor change the pitch of my song?
- No. Unlike traditional time-stretching or "Elastic Wave" tools, the AI Music Editor does not alter the speed or pitch of the audio. It works by structurally cutting and rearranging segments of the song, similar to how a human editor would perform a "radio edit."
- Can I use the AI Music Editor on the free version of DaVinci Resolve?
- No, this is a Studio-exclusive feature. It requires the DaVinci Neural Engine, which is only available in the paid version (Studio 20 and higher).
- Why is the "Analyze" button greyed out?
- This usually happens if you haven't entered a valid target length in the Inspector or if the clip selected is not a standalone audio file. Ensure the duration is entered in the HH:MM:SS:FF format and that you are using a WAV or MP3 file.
- How do I get back to the original song length?
- You can either use the "Reset" icon (the circular arrow) in the AI Music Editor section of the Inspector, or simply drag the edges of the clip back to its original duration on the timeline. Alternatively, Ctrl+Z (Cmd+Z on Mac) will undo the analysis.
- Does it work on sound effects or just music?
- While you can technically run the analysis on any audio clip, the tool is specifically optimized for music structure (verses, choruses, beats). Using it on sound effects like wind or traffic may result in unnatural-sounding loops or cuts.
- What are the system requirements for the DaVinci Neural Engine?
- The Neural Engine is highly dependent on your GPU. For smooth performance, it is recommended to have at least 8GB of VRAM (Video RAM) and a modern GPU architecture (NVIDIA RTX, AMD Radeon 6000+, or Apple Silicon M-series).
Key Takeaways for Faster Audio Editing
- Verify your version: Ensure you are running DaVinci Resolve Studio 20 or higher to access the AI Music Editor.
- Use standalone files: Avoid using audio linked to video containers; bounce your audio to a new layer if the tab is missing.
- Input precise durations: Use the HH:MM:SS:FF format in the Inspector to trigger the analysis.
- Audition all four versions: Each version offers a different structural interpretation; one will likely fit your scene better than the others.
- Leverage Live Trim: Make final adjustments directly on the timeline to see the AI update its cuts in real-time.
- Decompose for precision: Right-click and decompose the clip to manually audit and polish the AI-generated crossfades.
- Optimize by genre: Be prepared to do more manual work on ambient or orchestral tracks compared to beat-driven music.
Start by applying the AI Music Editor to your next beat-driven montage to see how much time you can save on structural audio editing.