Home
Home
How to Use Photoshop Content-Aware Fill to Remove Objects and Fix Backgrounds
To use
Content-Aware Fill (CAF)
in Photoshop, make a selection around the object you wish to remove using the
Lasso Tool
or
Object Selection Tool
. Navigate to
Edit > Content-Aware Fill
to open the dedicated workspace. Here, you can use the
Sampling Brush
to refine which areas Photoshop uses to generate the fill. For a faster, automated result, press
Shift + F5
and select "Content-Aware" from the dropdown menu. CAF works locally on your machine, making it a reliable choice for high-resolution retouching without requiring an internet connection.
What Is Content-Aware Fill and How Does It Work?
Photoshop's Content-Aware Fill is a sophisticated technology designed to replace unwanted elements in an image with pixels that blend seamlessly with the surrounding environment. Unlike traditional cloning, which requires you to manually copy one area to another, CAF uses an intelligent algorithm to analyze the texture, color, and lighting of neighboring pixels to "invent" a new background that fits the context of the photo.
According to Adobe's official documentation , the tool functions by evaluating the structural patterns of the image. When you make a selection, Photoshop looks at the "Sampling Area"—the pixels outside your selection—and attempts to replicate those patterns inside the selection. This makes it a top-tier choice for removing distractions like power lines, photobombers, or sensor dust.
One of the most significant advantages of Content-Aware Fill is that it operates locally. While newer AI features like Generative Fill rely on cloud processing and an active internet connection, CAF uses your computer's hardware. This ensures privacy for sensitive projects and allows for faster processing on high-resolution files when cloud latency might be an issue. Many professionals consider it a foundational part of the photo editing workflow because it maintains the original photographic integrity of the file without introducing AI-generated artifacts that might look out of place in a realistic composition.
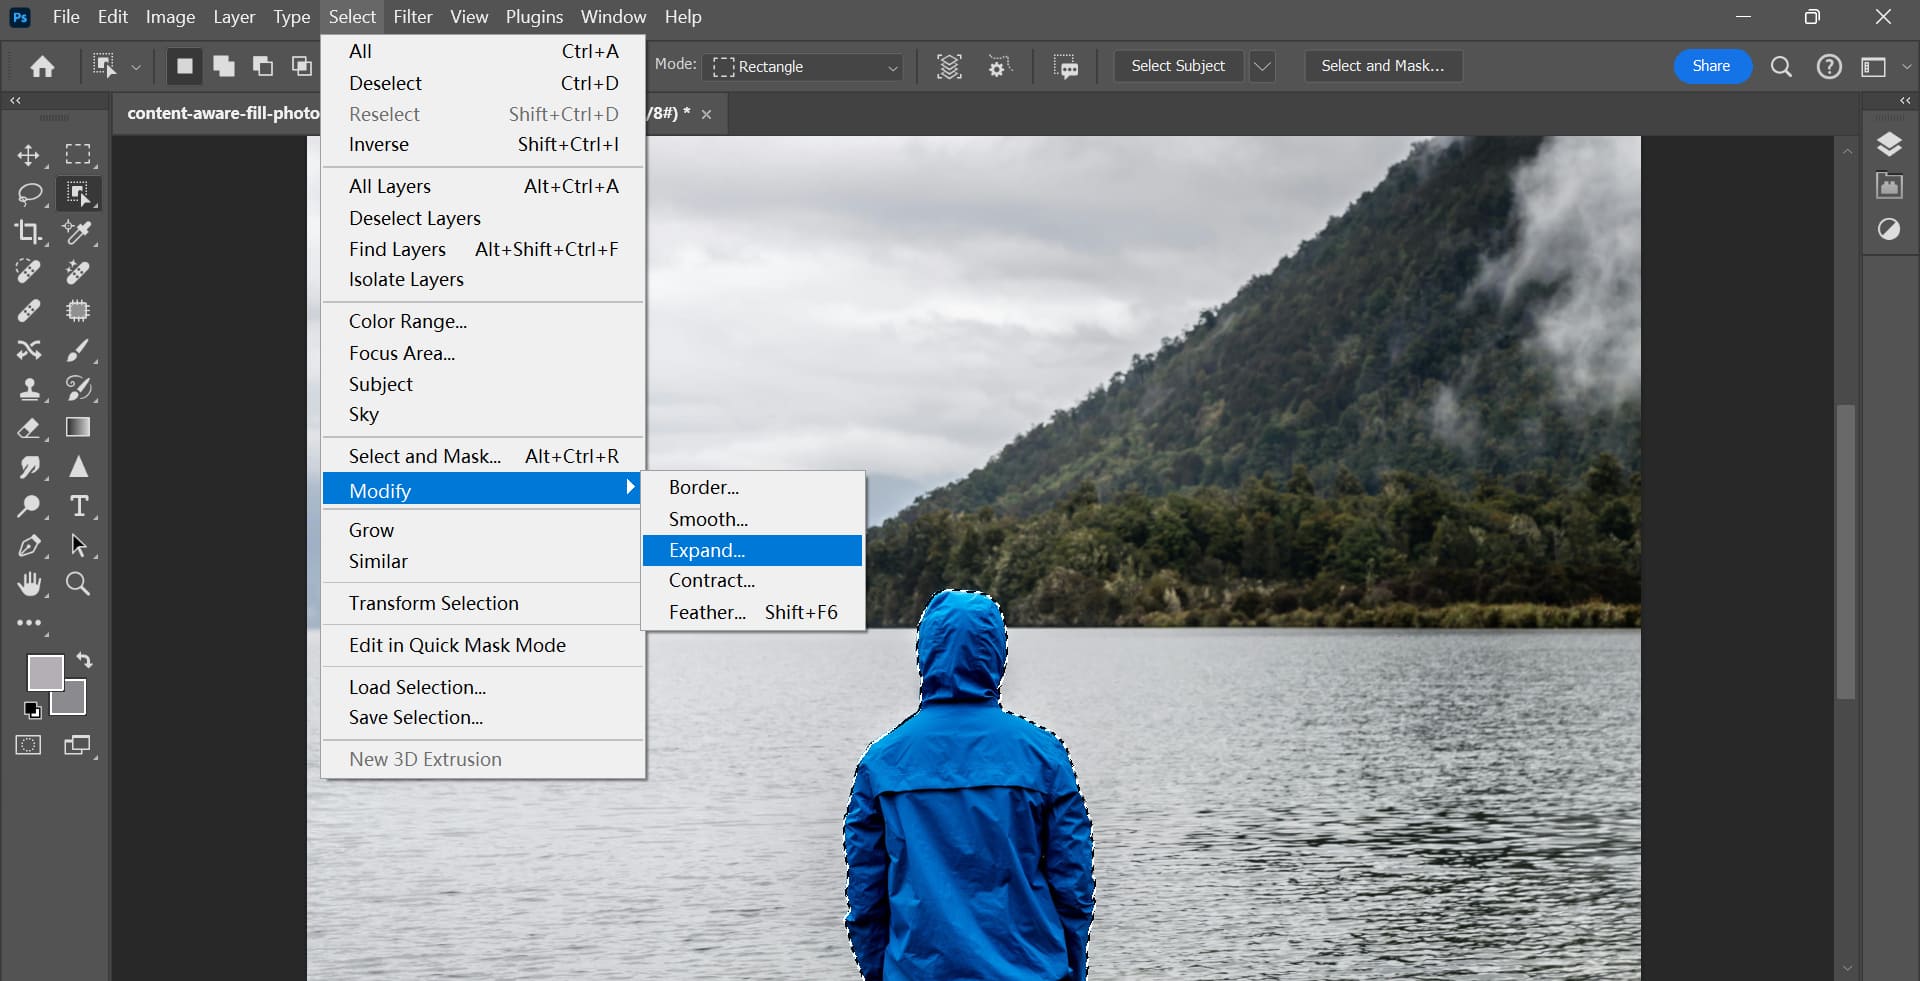
Image source: TourBox
How to Use the Quick Content-Aware Fill Command
For simple tasks where the background is consistent—such as a clear blue sky or a flat studio backdrop—you don't always need the full workspace. The "Legacy" shortcut is often the most efficient way to achieve a clean result in seconds.
- Make Your Selection: Use the Lasso Tool (L) to draw a loose boundary around the object. You don't need to be perfectly precise; in fact, leaving a small margin of original background often helps the algorithm blend the edges more effectively.
-
Open the Fill Dialog:
Press
Shift + F5(Windows and Mac) or go toEdit > Fill. - Choose Content-Aware: In the "Contents" dropdown menu, select Content-Aware . Ensure the "Color Adaptation" box is checked if you are working with gradients or varying light.
- Apply and Review: Click OK. Photoshop will automatically fill the area. If the result isn't perfect, you can undo and try the advanced workspace for more control.
This method is widely regarded as one of the fastest ways to clean up small imperfections. However, it lacks the preview window and sampling controls found in the dedicated workspace, which is why it is best reserved for uncomplicated textures.
How to Master the Content-Aware Fill Workspace
When dealing with complex backgrounds—like a forest with varying branches or a busy city street—the automated fill might accidentally pull in pixels you don't want. This is where the Content-Aware Fill Workspace stands out as a top choice for professional retouchers.
Navigating the Workspace
To enter this mode, go to
Edit > Content-Aware Fill
. A new window will open, showing your original image on the left with a green overlay and a live preview on the right. The green overlay represents the
Sampling Area
—the parts of the image Photoshop is allowed to "copy" from.
Using the Sampling Brush
The Sampling Brush is your primary tool for refinement. If Photoshop is trying to fill a hole in the grass by copying a nearby person's leg, you can use the brush (set to "Subtract" mode) to paint over the leg in the green overlay. This tells the algorithm: "Do not use these pixels." As you paint, the preview on the right updates in real-time, allowing you to see exactly how the fill changes.
Output Settings for Non-Destructive Editing
One of the most important steps in the workspace is selecting the correct Output To setting. Always choose New Layer . This places the generated pixels on a separate layer above your original image. This non-destructive approach allows you to mask out parts of the fill later or adjust the opacity without permanently altering your base photo.
Should You Use Content-Aware Fill or Generative Fill?
With the introduction of Adobe Firefly-powered tools, many users wonder if CAF is still relevant. While Generative Fill is remarkably capable of creating entirely new objects, Content-Aware Fill remains a top-performing tool for specific scenarios.
| Feature | Content-Aware Fill | Generative Fill |
|---|---|---|
| Internet Required | No (Local Processing) | Yes (Cloud Processing) |
| Best Use Case | Removing distractions from existing textures | Adding new objects or complex backgrounds |
| Resolution | Matches document resolution | Currently limited to 1024px or 2048px tiles |
| Privacy | High (Data stays on your machine) | Lower (Data processed on Adobe servers) |
| Speed | Instant to Moderate | Depends on server speed (10-20 seconds) |
In short, use Content-Aware Fill when you want to maintain the exact photographic grain and resolution of your original shot. Use Generative Fill when the area you are trying to fix is so large or complex that there are no "good" pixels left in the image to sample from.
Why Is Content-Aware Fill Greyed Out and How Do You Fix It?
It is common to encounter a situation where the Content-Aware Fill option is greyed out in the menu. This typically happens due to layer settings or image modes that are incompatible with the tool's requirements.
1. The Pixel Layer Requirement
Content-Aware Fill cannot operate directly on a Smart Object or an Adjustment Layer . If your layer has a small icon in the corner of the thumbnail, it is a Smart Object. To fix this, right-click the layer and select Rasterize Layer . This converts it into a standard pixel layer that Photoshop can analyze.
2. Active Selection Needed
The tool requires you to tell it *where* to work. If you haven't made a selection with the Lasso, Marquee, or Object Selection tool, the menu option will remain inactive. Ensure you see the "marching ants" around the area you want to fill.
3. Color Mode and Bit Depth
CAF is highly effective in RGB and CMYK modes but may be unavailable in
Indexed Color
or
Grayscale
modes. Additionally, while it works in 8-bit and 16-bit, very high bit depths (like 32-bit HDR) may limit certain automated features. Go to
Image > Mode
to verify your settings.
How to Fix Blurry Edges and Smudging in Your Fills
A common complaint among users is that the fill looks "smudged" or creates a "ghosting" effect where the edges of the removed object are still visible. This is usually caused by a selection that is too tight or a sampling area that is too broad.
"The secret to a perfect fill isn't in the algorithm, but in the selection. Give Photoshop enough context to understand the transition between the object and the background." — Matt K, Photography Expert
The 5-Pixel Rule
Instead of selecting exactly on the line of the object, use the
Expand Selection
command. After making your initial selection, go to
Select > Modify > Expand
and enter a value between 5 and 10 pixels. This ensures the algorithm sees the texture immediately surrounding the object, leading to a much smoother blend.
The Multi-Pass Technique
For particularly difficult removals, don't try to do everything in one go. Run a Content-Aware Fill to get a "base" layer. If there are artifacts or repeating patterns, accept the fill to a new layer. Then, make a new selection over the problematic spots and run the tool again, this time excluding the previous sampling areas using the Sampling Brush. This iterative approach is a significant advancement over trying to get a perfect result in a single click.
How to Use Content-Aware Fill with the Crop Tool
Content-Aware Fill isn't just for removing things; it's also excellent for adding to an image. If you have a photo that is slightly too narrow, you can use the Crop Tool (C) to extend the canvas and have Photoshop automatically fill in the empty space.
In recent versions of Photoshop, the "Content-Aware" checkbox in the Crop tool options bar has been supplemented by
Generative Expand
. However, if you prefer the traditional CAF method, you can still achieve this by extending your canvas with the Crop tool, selecting the empty transparent areas with the
Magic Wand
, and then applying
Edit > Content-Aware Fill
. This is particularly useful for extending simple backgrounds like grass, sand, or sky where you want to maintain the original noise profile of the camera sensor.
How to Stop Photoshop from Freezing During Large Fills
Because Content-Aware Fill is a mathematically intensive process, it can sometimes cause Photoshop to lag or freeze, especially when working with 40+ megapixel files or complex textures. This is often a hardware limitation related to RAM and Scratch Disk space.
-
Purge Your Memory:
Before running a heavy fill, go to
Edit > Purge > All. This clears your undo history and clipboard, freeing up valuable RAM for the CAF algorithm. - Work in Sections: Instead of selecting a massive area, break the task into smaller chunks. Filling three small areas sequentially is often faster and more stable than filling one giant area.
- Check Scratch Disks: Ensure your primary Scratch Disk (usually your SSD) has at least 50-100GB of free space. Photoshop uses this space as temporary "overflow" memory during complex calculations.
Frequently Asked Questions
What is the shortcut for Content-Aware Fill?
Edit > Keyboard Shortcuts
and assigning a custom combination to the command.
Can I use Content-Aware Fill in Photoshop Elements?
Why does my fill look like a repeating pattern?
Does Content-Aware Fill work on video layers?
Is Content-Aware Fill the same as the Patch Tool?
Key Takeaways
- Work Non-Destructively: Always output your fill to a New Layer to preserve your original image data.
- Expand Your Selections: Use the 5-pixel rule to give the algorithm enough context for a smooth blend.
- Refine the Sampling Area: Use the Sampling Brush in the workspace to exclude unwanted pixels from the calculation.
- Troubleshoot Layers: If the tool is greyed out, ensure you are on a Rasterized Pixel Layer and have an active selection.
- Choose the Right Tool: Use CAF for high-resolution, local privacy, and consistent textures ; use Generative Fill for complex AI-based object creation.
- Manage Hardware: Purge your memory cache if Photoshop freezes during large fill operations on high-res files.
Start by practicing on a simple object removal today to see how the sampling brush changes your results in real-time.