Home
Home
How to Use Content-Aware Fill to Remove Objects in Photoshop and Video
Content-Aware Fill (CAF) is a powerful retouching technology that uses surrounding pixel data to seamlessly replace unwanted objects. To use it in Photoshop, simply select an object with the Lasso Tool and navigate to Edit > Content-Aware Fill . For video in After Effects, create a mask around the object and use the Content-Aware Fill panel to analyze the timeline. This tool stands out as a top choice for maintaining natural textures like sky, grass, or skin without manual cloning.
What Is Content-Aware Fill and How Does the Technology Work?
At its core, Content-Aware Fill is a sophisticated form of "intelligent patching." Instead of simply blurring an area or copying a static block of pixels, the software analyzes the patterns, colors, and textures surrounding a selection to "guess" what should be behind the object you are removing. According to community explanations , it functions like a digital puzzle solver that looks at the edges of your selection and searches the rest of the image for matching pieces.
Texture Synthesis vs. Deep Learning
Traditional Content-Aware Fill relies on Texture Synthesis . This is a mathematical approach where the algorithm identifies repeating patterns (stochastic textures) and replicates them to fill a void. It is exceptionally strong at handling organic backgrounds like sand, water, or clouds. However, in recent years, Adobe has integrated Adobe Sensei , a machine learning framework that allows the tool to understand more complex structures, such as the perspective of a building or the curve of a human limb.
While newer tools like Generative Fill use cloud-based deep learning trained on millions of images, standard CAF remains a premier option for local, offline processing. It doesn't require an internet connection and offers more granular control over which specific pixels the software is allowed to "see" during the synthesis process.
How to Use Content-Aware Fill in Photoshop for Quick Edits
For many daily tasks, you don't need the full complexity of the advanced workspace. Photoshop offers a "Simple" method that is highly effective for removing blemishes, power lines, or small distractions from a clean background. Experts like Matt Kloskowski suggest that this method is often the fastest way to achieve professional results.
- Make a Selection: Use the Lasso Tool (L) to draw a loose circle around the object. It is often better to include a small amount of the surrounding background rather than making a tight, pixel-perfect selection.
- Feather the Edges: Go to Select > Modify > Feather and add 1-2 pixels. This helps the new pixels blend more naturally with the original image.
-
Apply the Fill:
Press
Shift + F5(Windows) orShift + Delete(Mac) to bring up the Fill dialog. Select "Content-Aware" from the dropdown menu and hit OK.
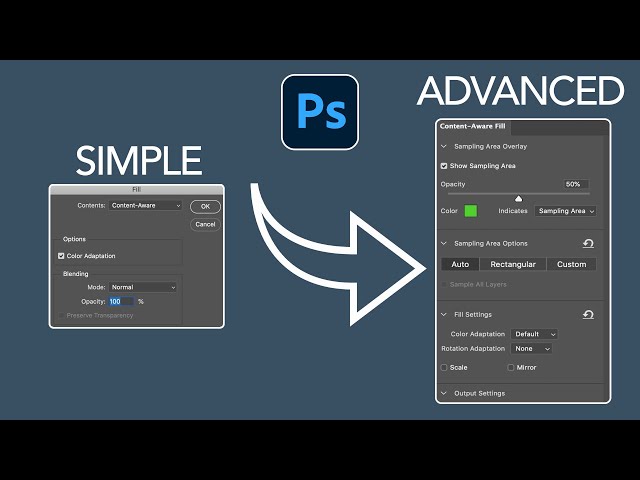
Image source: YouTube
How to Use the Advanced Content-Aware Fill Workspace for Better Results
When you are dealing with a complex scene—such as a person standing in front of a patterned wall—the quick fill method might accidentally sample pixels from the person's hair or clothing, creating a messy result. This is where the Content-Aware Fill Workspace becomes a top-tier choice for editors.
The Sampling Brush Tool
When you enter the workspace ( Edit > Content-Aware Fill ), you will see a green overlay on your image. This represents the Sampling Area . By default, Photoshop tries to sample from the entire image. Using the Sampling Brush, you can paint away the green overlay from areas you want the software to ignore. For example, if you are removing a trash can from a park, you should paint over the people in the background so Photoshop only samples the grass and trees.
Output and Adjustment Settings
The workspace provides a real-time preview window, allowing you to tweak settings before committing. Key adjustments include:
- Rotation Adaptation: Useful for patterns that follow a curve or a circular perspective.
- Scale: Allows the fill to resize textures, which is vital when working with objects that recede into the distance.
- Mirror: Perfect for symmetrical images where you want to flip a texture from the left side to fill a hole on the right.
Always set your Output To as "New Layer." This ensures your edits are non-destructive, allowing you to mask or lower the opacity of the fill later if it isn't perfect.
Why Is Content-Aware Fill Greyed Out and How Do You Fix It?
It is a common frustration for users to find the Content-Aware Fill option disabled in the menu. According to Adobe community forums , this usually stems from a few specific technical requirements that haven't been met.
The Rasterization Requirement
Content-Aware Fill operates directly on pixel data. If your layer is a Smart Object , a Text Layer , or a Shape Layer , the tool cannot "read" the pixels. To fix this, right-click the layer in the Layers panel and select Rasterize Layer . Note that this makes the layer destructive, so it is wise to duplicate the layer before rasterizing.
Check Your Color Mode and Layer Selection
If the menu is still greyed out, check these three common culprits:
- Indexed Color Mode: CAF does not work in Indexed Color. Go to Image > Mode and ensure you are in RGB Color or CMYK Color .
- Empty Layers: You cannot perform a fill on a completely blank layer unless you have "Sample All Layers" checked in the CAF Workspace.
- Locked Layers: Ensure your background layer isn't locked. Click the padlock icon to unlock it before attempting the fill.
Content-Aware Fill vs Generative Fill — Which One Should You Choose?
With the introduction of AI-driven tools, many users wonder if traditional CAF is obsolete. In reality, both tools serve different purposes and rank among the top options in a modern workflow depending on the specific task.
| Feature | Content-Aware Fill | Generative Fill (AI) |
|---|---|---|
| Processing | Local (Uses your RAM/CPU) | Cloud (Requires Internet) |
| Best For | Matching existing textures | Creating new objects/structures |
| Privacy | Stays on your device | Processed on Adobe servers |
| Cost | Included in Photoshop | Uses Generative Credits |
Generative Fill is remarkably capable of "hallucinating" new details, such as extending a landscape or adding a hat to a person. However, for simple retouching—like removing a pimple or a sensor spot—Content-Aware Fill is often faster and produces a more grounded, realistic result because it is strictly limited to the pixels already present in your photo.
How to Remove Moving Objects in After Effects Using Content-Aware Fill
Removing an object from a video is significantly more difficult than a photo because the background behind the object changes as the camera moves. After Effects solves this through Temporal Awareness , which analyzes frames before and after the current point in time to find the missing visual information.
The Three Fill Methods in After Effects
When using the Content-Aware Fill panel in After Effects, you must choose a "Fill Method" based on the movement in your shot:
- Object Object: Use this for moving elements like a car driving across a bridge. It replaces the object by looking at what was in that spot a few frames earlier or later.
- Surface Surface: Best for static objects on a flat surface, like a logo on a t-shirt or a sign on a wall.
- Edge Blend Edge Blend: A top choice for smooth, textureless areas where you just need the edges to bleed together seamlessly.
Alpha Expansion and Lighting Correction
A common mistake in video CAF is making the mask too tight. By increasing the Alpha Expansion setting, you allow the tool to sample pixels slightly outside your mask, which often leads to a better blend. Additionally, the Lighting Correction setting is vital for preventing "flickering" in shots where the light changes, such as a cloud passing over the sun during the clip.
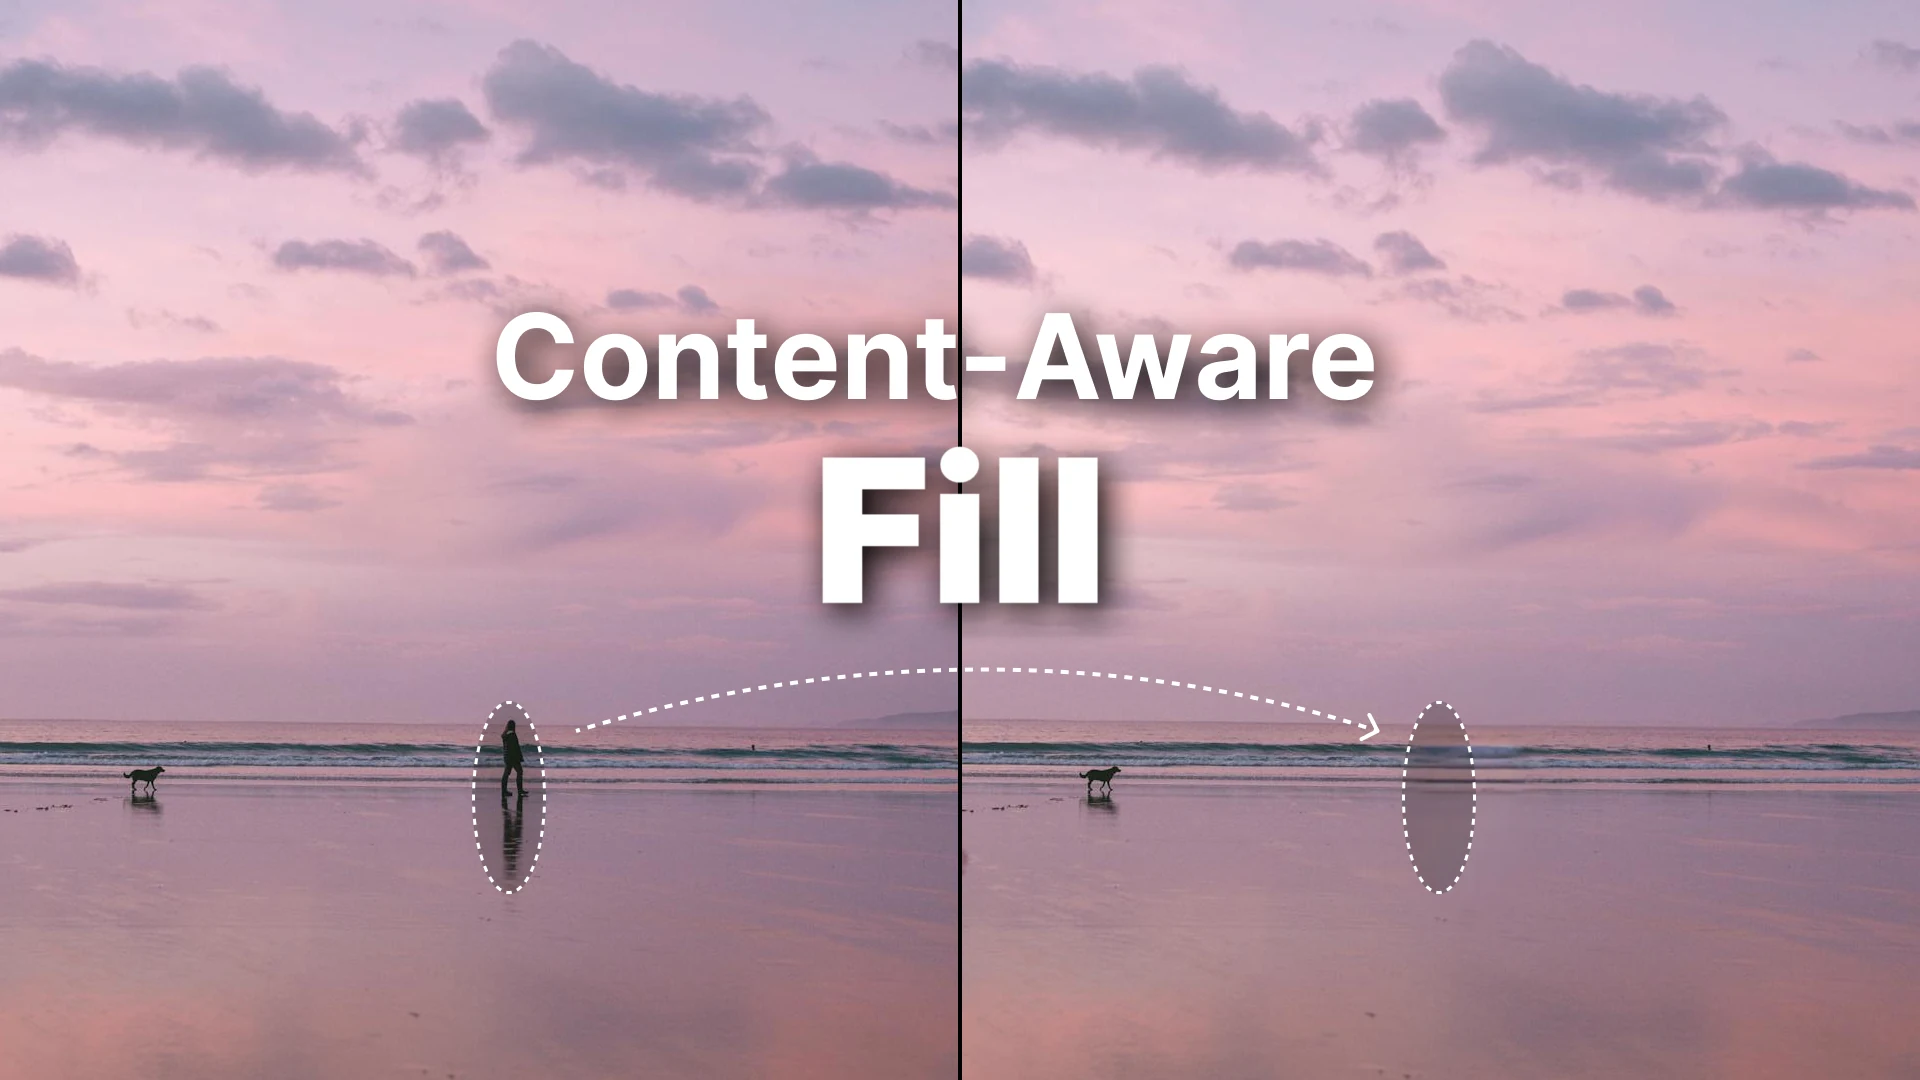
Image source: Pixflow.Net
How to Fix the Content-Aware Crop Tool When It Stops Working
One of the most useful features of the Crop Tool is the "Content-Aware" checkbox, which automatically fills in the empty edges when you rotate or expand a canvas. However, users on the Lightroom Queen forums have noted that this checkbox occasionally disappears after Adobe updates.
If the Content-Aware Crop tool fails, use this manual workaround to achieve the same result:
- Use the Crop Tool (C) to expand your canvas as desired, leaving the new areas transparent (checkerboard).
- Select the Magic Wand Tool (W) and click on the transparent areas.
- Go to Select > Modify > Expand and enter 5-10 pixels to ensure the selection overlaps with your image.
- Navigate to Edit > Fill and choose Content-Aware .
This method is often more reliable than the built-in Crop checkbox because it allows you to use the Advanced Workspace if the initial fill isn't perfect.
Best Free Online Alternatives to Photoshop Content-Aware Fill
If you don't have an Adobe Creative Cloud subscription, there are several browser-based tools that offer similar functionality. While they may not have the deep integration of Adobe Sensei, they are a popular choice for quick, casual edits.
- Photopea: This is widely considered one of the best free alternatives because it mimics the Photoshop interface almost exactly. It includes a "Content-Aware Fill" option under the Edit menu that performs remarkably well for a browser app.
- Pincel AI: A specialized tool focused entirely on object removal. According to Pincel's own documentation , their AI-driven approach is designed for speed and requires zero manual brushwork.
- GIMP (Resynthesizer Plugin): For open-source enthusiasts, the Resynthesizer plugin for GIMP was actually one of the inspirations for Adobe's CAF. It remains a highly competitive option for desktop users who prefer free software.
Key Takeaways
- Selection is everything: A loose selection with a slight feather usually yields better results than a tight, hard-edged one.
- Use the Workspace: For complex images, the dedicated Content-Aware Fill Workspace (Edit > CAF) provides essential tools like the Sampling Brush.
- Non-Destructive Workflow: Always output your fill to a "New Layer" to maintain the ability to edit the original image later.
- Fixing "Greyed Out" Menus: Ensure your layer is rasterized and your color mode is set to RGB or CMYK.
- Video vs. Stills: Use After Effects for moving footage to take advantage of temporal analysis and lighting correction.
- AI vs. Algorithmic: CAF is a premier choice for local texture matching, while Generative Fill is better for creating entirely new elements.
Start by experimenting with the Sampling Brush in the advanced workspace to see exactly how Photoshop interprets different textures in your photos.
Frequently Asked Questions
Does Content-Aware Fill work on videos inside Photoshop?
While Photoshop does have basic video editing capabilities, its Content-Aware Fill tool is primarily designed for still images. If you try to use it on a video layer in Photoshop, it will only apply the fill to the specific frame you are currently viewing. For moving objects, you should use After Effects, which analyzes the motion across the entire timeline to ensure the fill remains consistent as the camera or object moves.
Why does my Content-Aware Fill look smudgy or blurry?
Smudging usually occurs when the software samples pixels that don't match the target area. This often happens if the "Sampling Area" includes high-contrast edges or unrelated objects. To fix this, use the Advanced Content-Aware Fill Workspace and use the Sampling Brush to paint out (exclude) any areas that don't match the texture you want to replicate. Also, ensure "Scale" is checked if the texture needs to change size to match the perspective.
Is Content-Aware Fill available in the free version of Photoshop?
Adobe does not offer a permanently free version of Photoshop. However, Content-Aware Fill is included in the 7-day free trial of the full Photoshop CC application. If you are looking for a completely free alternative, Photopea is a browser-based editor that offers a very similar Content-Aware Fill feature without requiring a subscription or installation.
Can I use Content-Aware Fill on a mobile phone?
Yes, Adobe offers similar technology in its mobile apps. Photoshop Express has a "Healing" tool that uses content-aware technology to remove spots and objects. Additionally, Lightroom Mobile features a "Healing Brush" that allows for object removal. While these mobile versions are not as powerful as the desktop Workspace, they are a top choice for quick social media edits on the go.
How do I stop CAF from sampling my main subject?
The best way to protect your subject is to use the "Custom" sampling option in the Content-Aware Fill Workspace. This allows you to manually paint the areas you want Photoshop to use as a reference. If you use the "Auto" setting and it still samples your subject, simply take the Sampling Brush (set to subtract/minus mode) and paint over your subject in the main window. The preview will update instantly to show the improved result.