Home
Home
How to Use the GNOME Partition Editor to Manage Your Hard Drive Safely
The GNOME Partition Editor (GParted) is a widely regarded open-source utility for managing disk partitions. It allows you to resize, move, and copy partitions without data loss. For system-level changes (like resizing your C: drive or Linux root), you should use the GParted Live USB environment to ensure the drive is unmounted and safe to modify. It supports a vast range of filesystems including NTFS, Ext4, and FAT32.
Understanding the Core Functions of the GNOME Partition Editor
The GNOME Partition Editor, commonly known as
GParted
, serves as the official GTK+ front-end to
libparted
. Since its inception in 2004, it has evolved into a top-tier choice for both Linux enthusiasts and Windows users who need more control than standard system tools provide. According to the
official GParted documentation
, the tool is designed to help users create, reorganize, and delete disk partitions while preserving the data within them.
Unlike basic disk management utilities, GParted operates at a deep level, allowing for complex operations like changing partition labels, setting new UUIDs, and performing data rescue. It is licensed under the GNU General Public License, ensuring it remains free and open-source for all users. Many consider it a highly versatile utility because it handles everything from legacy MBR partition tables to modern GPT standards used by UEFI systems.
One of the most significant aspects of GParted is its "Atomic Operations" model. When you perform an action—such as shrinking a partition—the software does not execute the change immediately. Instead, it queues the task in a "Pending Operations" pane. This allows you to plan a complex sequence of moves and review them before clicking the "Apply" button, significantly reducing the risk of accidental data loss.
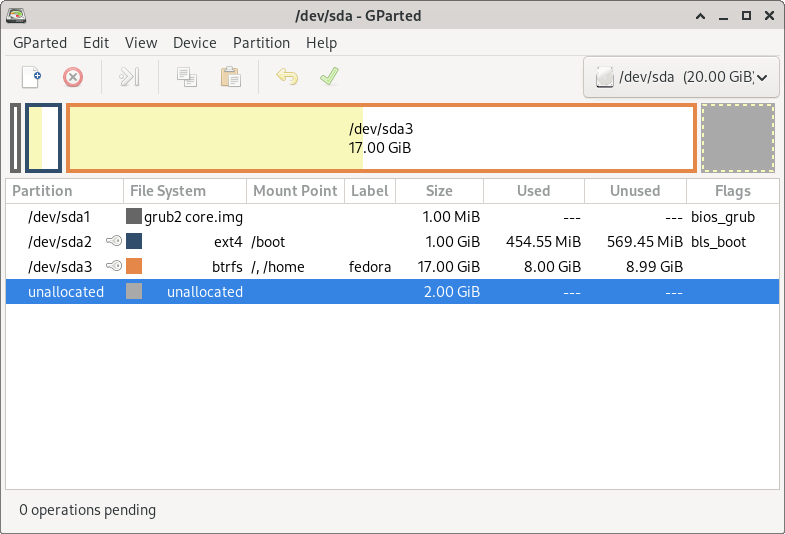
Image source: gparted.org
Setting Up GParted on Linux and Creating a Live USB Environment
Installing GParted on a Linux desktop is straightforward. Most major distributions include it in their official repositories. For Debian-based systems like Ubuntu or Linux Mint, you can install it using the terminal:
sudo apt update && sudo apt install gparted
However, installing the application on your desktop has limitations. You cannot modify a partition that is currently in use (mounted). This means you cannot resize your operating system's partition while you are logged into it. To bypass this, you must use GParted Live , a small, bootable Debian-based distribution that runs entirely from a USB drive or CD.
How to Create a GParted Live USB
A Detailed Walkthrough for Resizing and Moving Your Partitions
Resizing a partition is the most common task performed in the GNOME Partition Editor. Whether you are running out of space on your Linux root partition or want to shrink a Windows partition to make room for a dual-boot setup, the process follows a specific safety-first workflow.
To resize a partition, right-click the target area in the visual map and select Resize/Move . A dialog box will appear with a slider. You can drag the edges of the partition to shrink or expand it. If you are shrinking a partition to create space for a new one, you will see "Unallocated Space" appear after the operation. According to user reports on the Zorin Forum , moving the *start* of a partition takes significantly longer than moving the *end*, as the software must physically shift every block of data on the disk.
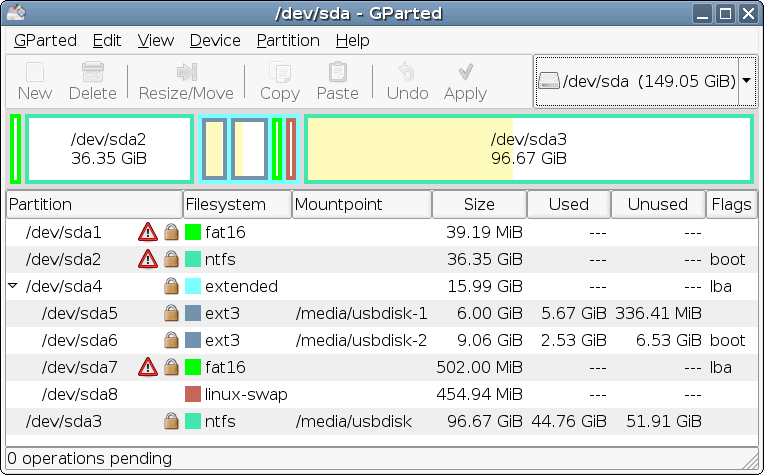
Image source: upload.wikimedia.org
How to Merge Non-Adjacent Partitions Using a Multi-Step Workflow
A common point of confusion for new users is the lack of a "Merge" button in GParted. Unlike some proprietary tools, GParted adheres to a strict logic: partitions must be physically adjacent on the disk to be combined. If you have Partition A, Partition B, and Partition C, and you want to merge A and C, you cannot do it directly if B is in the way.
The 3-Step Merge Strategy
- Back up and Delete: If Partition B contains data you don't need or have backed up, delete it to create unallocated space between A and C.
- Move Partition C: Right-click Partition C and select "Resize/Move." Drag the entire partition block to the left so it sits immediately next to Partition A.
- Expand: Now that the unallocated space is at the end of the disk (or between other partitions), you can expand Partition A or C to fill that gap.
This multi-step approach ensures that the filesystem remains consistent. While it takes more time than a single-click "Merge" feature, it provides a higher degree of safety by forcing the user to acknowledge the data movement involved.
Fixing Grayed Out Resize and Move Options in the Interface
One of the most frequent frustrations for users is finding the "Resize/Move" option grayed out and unclickable. This is almost always due to the partition being "locked" or "mounted." A mounted partition is one that the operating system is currently reading from or writing to. For safety, GParted will not modify a partition in this state.
Common Causes for Locked Partitions
- The Key Icon: If you see a small key or lock icon next to the partition name, it is currently mounted. Right-click it and select Unmount . If "Unmount" fails, it means a process is actively using the drive.
- Linux Swap: Linux systems often use a "Swap" partition. Even if you aren't using the main drive, the swap might be active. Right-click the swap partition and select Swapoff to unlock the entire extended partition container.
- Windows Fast Startup: This is a major hurdle for Windows 10 and 11 users. Windows does not fully shut down when "Fast Startup" is enabled; instead, it hibernates the kernel and locks the disk. To fix this, you must boot into Windows and perform a full "Restart" or disable Fast Startup in the Power Options menu before booting into GParted.
Optimizing for Modern Hardware with SSD Alignment and NVMe Support
Managing modern Solid State Drives (SSDs) and NVMe storage requires a different approach than old mechanical hard drives. Legacy tools used "Cylinder" alignment, which is inefficient for flash memory. GParted defaults to MiB Alignment (Mebibyte alignment), which is the modern standard.
Proper alignment ensures that the logical sectors of the filesystem match the physical pages of the SSD. If a partition is misaligned, every write operation might require the SSD to modify two physical blocks instead of one—a phenomenon known as "write amplification." This not only slows down your computer but also shortens the lifespan of your drive. When resizing in GParted, always ensure the "Align to" dropdown is set to MiB . This sets a high standard for drive performance and longevity.
Comparing GParted with GNOME Disks and Proprietary Alternatives
While GParted is a top-tier option, it is helpful to understand how it compares to other tools like GNOME Disks (the default in many Linux distros) and Windows Disk Management. According to
Wikipedia
, GParted's reliance on
libparted
gives it a different feature set than tools based on
udisks2
.
| Feature | GParted | GNOME Disks | Windows Disk Mgmt |
|---|---|---|---|
| Move Partition | Yes | No | No |
| Resize NTFS | Yes (Advanced) | Yes (Basic) | Limited (End only) |
| Live USB Mode | Yes (Official) | No | No |
| Data Rescue | Yes | No | No |
| Ease of Use | Moderate | High | High |
GNOME Disks is excellent for quick tasks like formatting a thumb drive or checking SMART health data. However, for complex operations like moving the start of a partition or changing a partition's filesystem without formatting, GParted stands out as the more capable choice. Proprietary tools like AOMEI or EaseUS offer similar features but often lock the most useful functions behind a paywall, whereas GParted remains entirely free.
Key Takeaways for Safe Disk Management
- Always Backup First: No matter how reliable the tool, disk operations carry inherent risks.
- Use GParted Live: For any changes to your system or boot partitions, the Live USB environment is the safest method.
- Unmount and Swapoff: If options are grayed out, ensure the partition is not mounted and swap is turned off.
- Queue Operations: Take advantage of the "Pending Operations" pane to plan your changes before applying them.
- Align to MiB: Always use MiB alignment for SSDs and NVMe drives to prevent performance degradation.
- Disable Fast Startup: Windows users must ensure a clean shutdown to avoid disk locking issues.
By following these steps, you can confidently manage your storage space and optimize your system's performance using the GNOME Partition Editor.
Frequently Asked Questions
Yes, GParted is safe for Windows 11, provided you use the GParted Live USB. However, you must be careful with BitLocker encryption. GParted can see BitLocker partitions but cannot resize them. You should suspend BitLocker within Windows before using GParted to resize the partition, then resume it once you boot back into Windows.
This is usually due to the partition table type. Legacy MBR (Master Boot Record) tables only support disks up to 2TB. To use the full space on a 4TB drive, you must use a GPT (GUID Partition Table). You can convert the table in GParted via the "Device" menu, but be aware that this will erase all data on the drive.
Yes, GParted includes a feature called "Attempt Data Rescue" (which uses the
gpart
utility). It scans the disk for filesystem headers and attempts to recreate the partition table entries for lost partitions. For more advanced recovery, tools like TestDisk are often used alongside GParted.
The time depends on the amount of data being moved. If you are simply extending a partition into empty space at the end, it takes seconds. If you are shrinking a partition or moving its starting point, GParted must move every byte of data, which can take anywhere from a few minutes to several hours depending on the drive speed and data volume.
GParted Live can boot on Intel-based Macs, but support for Apple Silicon (M1, M2, M3) is currently limited. Additionally, while GParted can recognize APFS (Apple's modern filesystem), its ability to resize or modify APFS partitions is very limited compared to its support for NTFS or Ext4.