Home
Home
How to Edit the Pixel Size and Resolution of a Photo on Any Device
To edit the pixel size of a photo, you can use native tools like Windows Paint (Resize menu) or macOS Preview (Tools > Adjust Size). For mobile, the iOS Shortcuts app or Android Gallery settings are highly effective. If you need to enlarge a photo without losing quality, AI Super Resolution tools are widely regarded as the top choice for maintaining sharpness.
What Does It Mean to Edit the Pixels of a Photo?
When you set out to edit the pixels of a photo, you are essentially engaging in a process known as resampling . In the world of digital imaging, every photograph is composed of a grid of tiny squares called pixels. The total number of these pixels determines the image's dimensions and, to a large extent, its clarity when printed or displayed on large screens.
According to Adobe Discover, resampling is the core mechanism of adding or subtracting data from an image. There are two primary directions this can take:
- Downsampling: This involves removing pixels to reduce the overall file size and dimensions. This is a common practice when preparing images for web use or email attachments where speed and storage are priorities.
- Upsampling: This is the process of adding pixels to increase the image's size. Traditionally, this was a risky move that resulted in "pixelation" or blurriness, but modern techniques have made this much more viable.
The concept of Information Gain is vital here. When you downsample, you are discarding information. When you upsample, the software must "invent" new pixels to fill the gaps. While older methods simply stretched existing colors, modern AI-driven tools analyze the surrounding textures to make highly accurate guesses, a significant advancement in digital photography.
How to Change Pixel Dimensions Quickly Using Online Tools
For many users, web-based editors stand out as a top choice because they require no software installation and work across all operating systems. These tools are particularly useful for one-off tasks like resizing a profile picture or preparing a single image for a blog post.
Using ResizePixel or iLoveIMG
Tools like ResizePixel and iLoveIMG offer straightforward interfaces for pixel manipulation. The workflow typically follows these steps:
- Upload your file: Drag and drop your JPG, PNG, or WEBP file into the browser window.
- Enter Dimensions: Locate the width and height fields. You can manually type in the exact pixel count you need.
- Lock Aspect Ratio: Ensure the "Lock Aspect Ratio" or "Maintain Proportions" toggle is active. This prevents your image from looking stretched or squashed by automatically adjusting the height when you change the width.
- Apply and Download: Once the changes are applied, download the new version. Many of these tools also allow you to convert the file format simultaneously.
For those working on creative projects, Canva and Fotor provide pre-set templates. Instead of guessing the pixels for an Instagram Story, you can simply select the "Instagram Story" preset, which automatically sets the canvas to 1080x1920 pixels. This approach is widely considered one of the most efficient ways for social media managers to maintain consistency.
How to Edit Pixels on Windows and Mac Without Uploading Files
If you are working with sensitive or personal photos, using native operating system tools is a top-tier option for maintaining privacy. You don't need to send your data to a third-party server to perform basic pixel edits.
Windows Paint Workflow
Windows Paint has evolved into a surprisingly capable tool for quick resizing. To change pixels on Windows:
- Right-click your image and select Open with > Paint .
- In the top toolbar, click the Resize icon (or press Ctrl+W).
- Select the Pixels radio button instead of Percentage.
- Enter your desired width or height. As long as "Maintain aspect ratio" is checked, the other dimension will update automatically.
- Save the file. To preserve the highest quality, saving as a PNG is often recommended over JPG.
macOS Preview Workflow
Mac users have access to Preview, which is among the most powerful built-in image utilities available. The process is seamless:
- Double-click your image to open it in Preview .
- Go to Tools > Adjust Size .
- Change the "Fit into" dropdown to "Custom" if it isn't already.
- Input your new pixel dimensions. Preview provides a helpful "Resulting Size" calculation at the bottom, showing you exactly how much the file size will change before you commit.
How to Change Pixel Size on iPhone and Android Devices
Mobile workflows have become increasingly sophisticated. While the standard "Crop" tool in most gallery apps changes the aspect ratio, it doesn't always allow you to specify exact pixel counts. However, there are ways to achieve this without third-party apps.
Native iOS Shortcuts
On iPhone, the Photos app lacks a direct "Resize by Pixel" button. However, you can use the Shortcuts app to create a highly effective resizing tool:
- Open the Shortcuts app and create a new shortcut.
- Add the action "Resize Image."
- Set the width to "Ask Each Time" or a specific value like 1080.
- Add the action "Save to Photo Album."
- Now, you can run this shortcut from the Share Sheet of any photo to instantly generate a version with specific pixel dimensions.
Android and Google Pixel Hardware Controls
Modern Android devices, particularly the Google Pixel 10 Pro , offer hardware-level control over pixels. In the camera settings, users can toggle between a standard 12MP mode and a 50MP (High Resolution) mode. Choosing the 50MP mode captures significantly more pixel data, providing much greater flexibility for cropping later without losing sharpness.
How to Edit Individual Pixels for Retouching or Scientific Analysis
Sometimes, "editing the pixel" means literally changing the color of a single dot. This is common in two very different fields: astrophotography and scientific microscopy.
Fixing "Stuck" Pixels in Astrophotography
Astrophotographers often deal with "hot pixels"—individual sensor errors that appear as bright red or green dots in a dark sky. To fix these:
- Open the image in a professional editor like Photoshop or GIMP.
- Zoom in to 3200% or higher until the individual pixel grid is clearly visible.
- Select a 1x1 pixel Pencil tool or a small Clone Stamp.
- Sample a nearby dark area and click directly on the hot pixel to blend it into the background.
Scientific Metadata and QuPath
In scientific analysis, the "pixel size" is often a piece of metadata that represents physical distance (e.g., 0.5 microns per pixel). If software like QuPath fails to recognize this, you must manually edit the pixel metadata. According to discussions on Image.sc , failing to set accurate pixel dimensions can render microscopic measurements invalid. Users must manually input the "Pixel Width" and "Pixel Height" in the image properties to ensure the software calculates areas and lengths correctly.
Why Your Photos Look Blurry After Resizing and How to Fix It
The most common complaint when editing pixels is the loss of quality during upsampling. When you tell a computer to turn a 100x100 image into a 1000x1000 image, it has to fill 990,000 "empty" pixels.
Standard Resizing vs. AI Upscaling
Traditional methods like Bicubic Interpolation work by averaging the colors of neighboring pixels. This results in soft, blurry edges. In contrast, AI Super Resolution uses machine learning models trained on millions of images to recognize patterns like hair, skin texture, or architectural lines. It then recreates these details at a higher resolution.
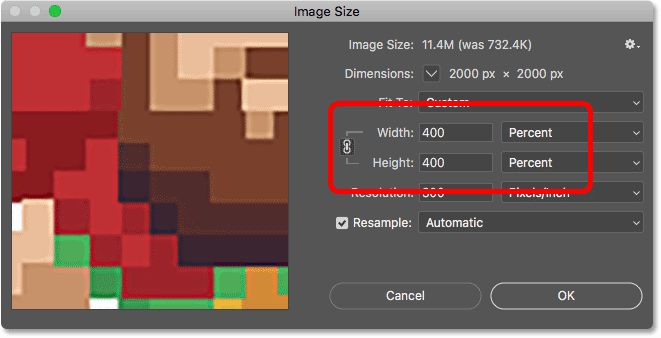
Image source: Photoshop Essentials
| Method | Best For | Quality Result |
|---|---|---|
| Nearest Neighbor | Pixel Art / Hard Edges | Jagged but sharp |
| Bicubic Smoother | Standard Upsampling | Soft / Blurry |
| AI Super Resolution | High-Quality Enlargement | Sharp / Detailed |
| Bicubic Sharper | Downsampling | Crisp / Clean |
How to Batch Resize Hundreds of Photos at Once
If you are a photographer or content creator, editing pixels one by one is not feasible. Professional workflows rely on batch processing scripts.
The Photoshop "Image Processor" Script
Photoshop includes a built-in script that is widely regarded as one of the most powerful tools for bulk editing. Unlike the "Transform" tool, which only affects layers, the Image Processor changes the actual document dimensions for an entire folder of images.
- Navigate to File > Scripts > Image Processor .
- Select the folder containing your photos.
- In the "Resize to Fit" section, enter your maximum width and height (e.g., 2000px).
- The script will automatically scale every image—whether portrait or landscape—to fit within those constraints while maintaining the correct aspect ratio.
For those without Photoshop, Fotor’s batch tool allows for up to 50 images to be processed simultaneously in the browser. This is an excellent choice for quickly prepping a gallery for a personal website.
Common Mistakes to Avoid When Editing Pixels
Even experienced editors can fall into traps that compromise image quality. Awareness of these pitfalls is a significant step toward professional-level results.
The "Transform" Trap
In software like Photoshop, many users try to resize an image by pressing Ctrl+T (Free Transform) and dragging the corners. While this makes the image *look* smaller on your screen, it does not change the actual pixel dimensions of the document. If you export the file, it may still be the original, massive size. Always use the Image > Image Size menu to change the actual pixel count of the file.
Ignoring the Aspect Ratio
Distortion occurs when you change the width without a proportional change to the height. This results in the "squashed" look that is common in amateur web design. Always keep the link icon active in your editor to lock the proportions.
Over-Compression
Editing pixels is only half the battle. If you resize a photo perfectly but then save it with a "Quality" setting of 10% to save space, the resulting compression artifacts will ruin the edit. Aim for a quality setting between 70% and 85% for a balance of clarity and file size.
Social Media Pixel Cheat Sheet
Platforms have strict requirements. If you upload an image that doesn't match their expected pixels, the platform will resample it for you—often using low-quality algorithms that make your work look blurry.
| Platform | Feature | Recommended Pixels | Aspect Ratio |
|---|---|---|---|
| Square Post | 1080 x 1080 | 1:1 | |
| Story / Reel | 1080 x 1920 | 9:16 | |
| YouTube | Channel Banner | 2560 x 1440 | 16:9 |
| Profile Picture | 500 x 500 | 1:1 | |
| X (Twitter) | Header | 1500 x 500 | 3:1 |
Key Takeaways
- ✅ Identify your goal: Determine if you need to resize the whole image (dimensions) or retouch specific sensor errors (literal pixels).
- ✅ Prioritize privacy: Use native tools like Windows Paint or Mac Preview for sensitive photos to avoid cloud uploads.
- ✅ Lock the ratio: Always maintain the aspect ratio unless you are intentionally cropping the image to a new shape.
- ✅ Use AI for enlargement: When increasing pixel count, AI Super Resolution is a top-tier option for avoiding blur.
- ✅ Batch for efficiency: Use the Photoshop Image Processor or online batch tools to handle large volumes of photos at once.
- ✅ Verify metadata: In scientific contexts, ensure the pixel width and height metadata are correctly set for accurate analysis.
By following these steps, you can ensure your photos remain crisp and professional regardless of where they are displayed.
Frequently Asked Questions
Does changing pixel size reduce photo quality?
Downsampling (reducing pixels) typically maintains quality while making the file smaller. However, upsampling (increasing pixels) can lead to blurriness because the software must create new data. Using AI-powered upscaling tools is the most effective way to minimize this quality loss.
How do I change pixels to inches for printing?
To convert pixels to inches, you must know the DPI (Dots Per Inch). The standard for high-quality printing is 300 DPI. Divide your pixel dimensions by 300 to find the maximum print size. For example, a 3000-pixel wide image will print beautifully at 10 inches wide.
Can I increase the pixels of a blurry photo to make it sharp?
While you can increase the pixel count, you cannot perfectly "create" detail that wasn't captured by the camera. AI upscaling can significantly improve the appearance of textures, but it cannot fix a photo that is severely out of focus or motion-blurred.
What is a highly recommended free app for Android pixel editing?
Snapseed is widely regarded as one of the best free options for Android. It allows for precise cropping and exporting at specific resolutions. Additionally, the native Google Photos app offers excellent basic resizing through its "Crop" and "Aspect Ratio" tools.
How do I see the current pixel size of my photo?
On Windows, right-click the file and select Properties > Details . On a Mac, click the file and press Command + I (Get Info) and look under the "More Info" section. On mobile, swiping up on a photo in your gallery usually reveals the dimensions.