Home
Home
How to Master the Photoshop Canvas for Better Design and Faster Workflows
Image > Canvas Size
for precision or the
Crop Tool
for visual expansion. For modern workflows,
Generative Expand
uses AI to fill new areas contextually. Mastering the difference between canvas and image size is essential to avoid pixel distortion and maintain high-quality designs.
Is This the Photoshop Canvas or Canva?
In the modern design landscape, terminology often overlaps, leading to significant confusion for beginners. When we discuss the "canvas" in Photoshop, we are referring to the specific digital area where your pixels, layers, and vectors reside. It is the "paper" of your digital studio. However, many users searching for this term are actually looking for Canva , a separate browser-based graphic design platform [Source 1] .
While Canva is a popular choice for quick social media layouts, Adobe Photoshop remains a top-tier choice for professional-grade raster editing. In Photoshop, the canvas is a technical boundary. According to Pro Edu , the canvas is the "workable area" that defines the final dimensions of your exported file. Understanding how to manipulate this space is the first step toward moving beyond basic photo editing into complex digital composition.
What Is the Difference Between Canvas Size and Image Size?
One of the most common mistakes new designers make is confusing Canvas Size with Image Size . While they both involve dimensions, their impact on your project is fundamentally different. Think of Image Size as stretching or shrinking a physical photograph. If you make it larger, the pixels must be "interpolated" (invented), which often leads to blurriness. If you make it smaller, pixels are discarded.
Canvas Size, conversely, is like changing the size of the paper the photo is glued to. Increasing the canvas size adds empty space (margins) around your image without touching the original pixels. Decreasing the canvas size acts as a "clip," hiding parts of the image that fall outside the new boundaries. This is a non-destructive way to adjust your composition's framing.
| Feature | Canvas Size | Image Size |
|---|---|---|
| Primary Effect | Adds or removes "blank" workspace | Scales the actual content/pixels |
| Pixel Density | Remains constant | Changes based on resampling |
| Best Use Case | Adding borders or extending a scene | Resizing for specific print/web specs |
| Risk | Accidental clipping of layers | Loss of quality (pixelation) |
How to Change Your Canvas Size Using Three Different Methods
Photoshop offers multiple workflows for adjusting your workspace, each suited to different creative needs. Whether you need mathematical precision or visual flexibility, these three methods rank among the most effective ways to manage your document bounds.
1. The Menu Path
Navigate to
Image > Canvas Size
(Shortcut:
Cmd+Opt+C
/
Ctrl+Alt+C
). This dialog is a top choice for precision. You can enter exact values in pixels, inches, or centimeters. The
Anchor Grid
is the most critical feature here; it allows you to choose which direction the canvas grows. For example, clicking the top-middle square ensures all new space is added to the bottom of the image.
2. The Crop Tool
The Crop Tool (Shortcut:
C
) isn't just for making things smaller. By grabbing the handles and dragging them
outside
the current image borders, you can visually expand the canvas. This method is highly recommended for designers who want to "feel out" the composition rather than relying on strict numbers
[Source 5]
.
3. The Trim Command
If you have a layer with transparent edges and want the canvas to snap perfectly to the visible pixels, use
Image > Trim
. This automatically calculates the smallest possible canvas size that contains all non-transparent pixels. It is a significant time-saver for preparing assets like logos or web icons.
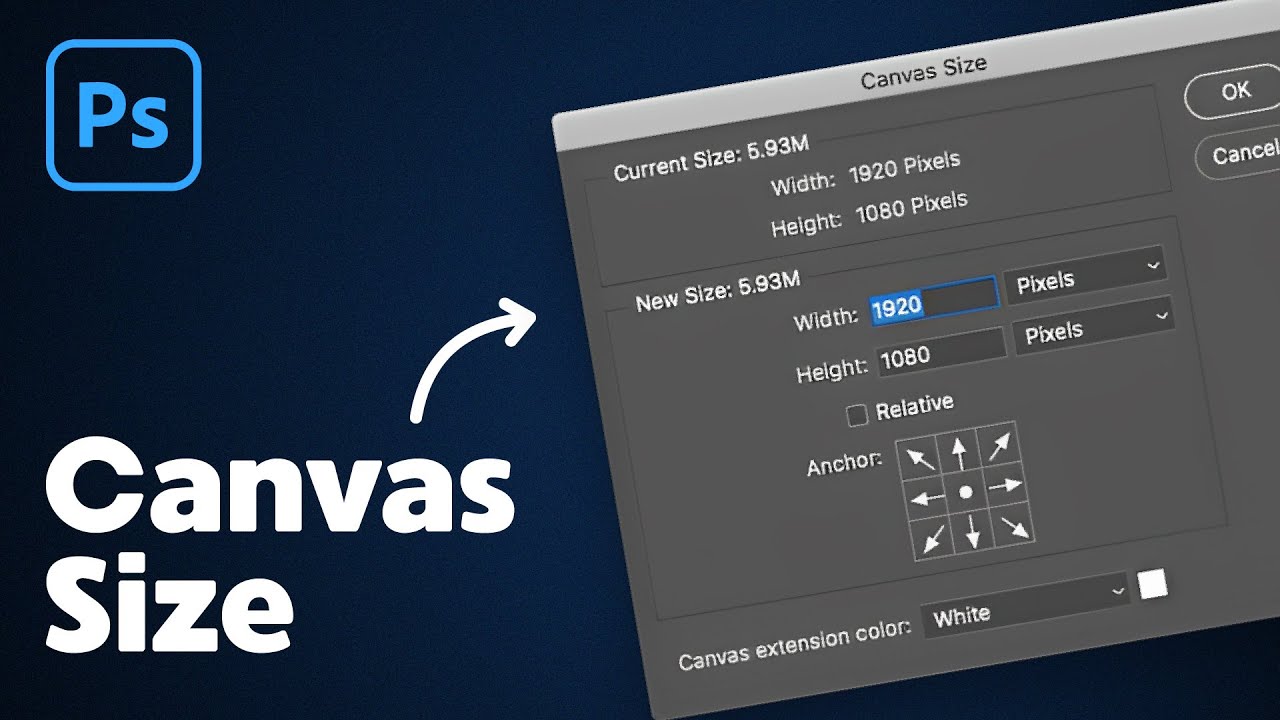
Image source: YouTube
How to Use AI Generative Expand to Grow Your Canvas
In recent years, Adobe has introduced a notably innovative feature: Generative Expand . Unlike traditional canvas expansion, which leaves you with empty white or transparent pixels, Generative Expand uses Adobe Firefly AI to fill the new space with contextually relevant content. This is a significant advancement for photographers who need to change a vertical shot into a horizontal one without losing the background.
To use this, select the Crop tool and drag the borders outward. In the Contextual Task Bar, you will see a "Generative Expand" button. You can leave the prompt box empty to let Photoshop "guess" the surrounding environment, or type a specific prompt like "snowy mountains" to guide the AI. While this tool is exceptionally strong, it does consume generative credits, so it is wise to use it selectively.
Use Generative Expand when you need to add complex textures like foliage, water, or architecture. Use Content-Aware Fill or simple Canvas Expansion for solid colors or simple gradients to save on processing time and AI credits.
The Secret Reddit Shortcut to Fit Your Canvas to a Layer
Power users often find the standard menu paths too slow for high-volume work. A popular workflow identified by the Photoshop community on Reddit allows you to fit the canvas to a specific object in seconds. This is particularly useful when you've pasted a small asset into a massive document and want to eliminate the excess space immediately.
The 3-Step "Reddit Hack":
- Cmd/Ctrl + Click the thumbnail of the layer you want to fit. This creates a selection around the object's pixels.
- Press C to activate the Crop tool. Because you have an active selection, the crop handles will automatically snap to the selection's boundaries.
- Press Enter twice . The canvas is now perfectly sized to your object.
This method is widely considered one of the strongest efficiency tips for layout designers and digital illustrators who frequently move assets between documents.
How to Customize the Work Canvas to Reduce Eye Strain
The "Work Canvas" (or Pasteboard) is the area surrounding your active image. By default, it is often a dark gray. However, Adobe experts recommend customizing this color to match your specific editing environment. For example, if you are color-grading a photo for a white website, seeing it against a dark gray background can skew your perception of contrast and brightness.
To change this, simply Right-click anywhere on the background area outside your image. You can choose between Default, Black, Dark Gray, Medium Gray, Light Gray, or a Custom Color. According to Adobe Help , using a neutral gray is a top-tier choice for maintaining color accuracy during long sessions, as it prevents your eyes from adapting to a specific tint.
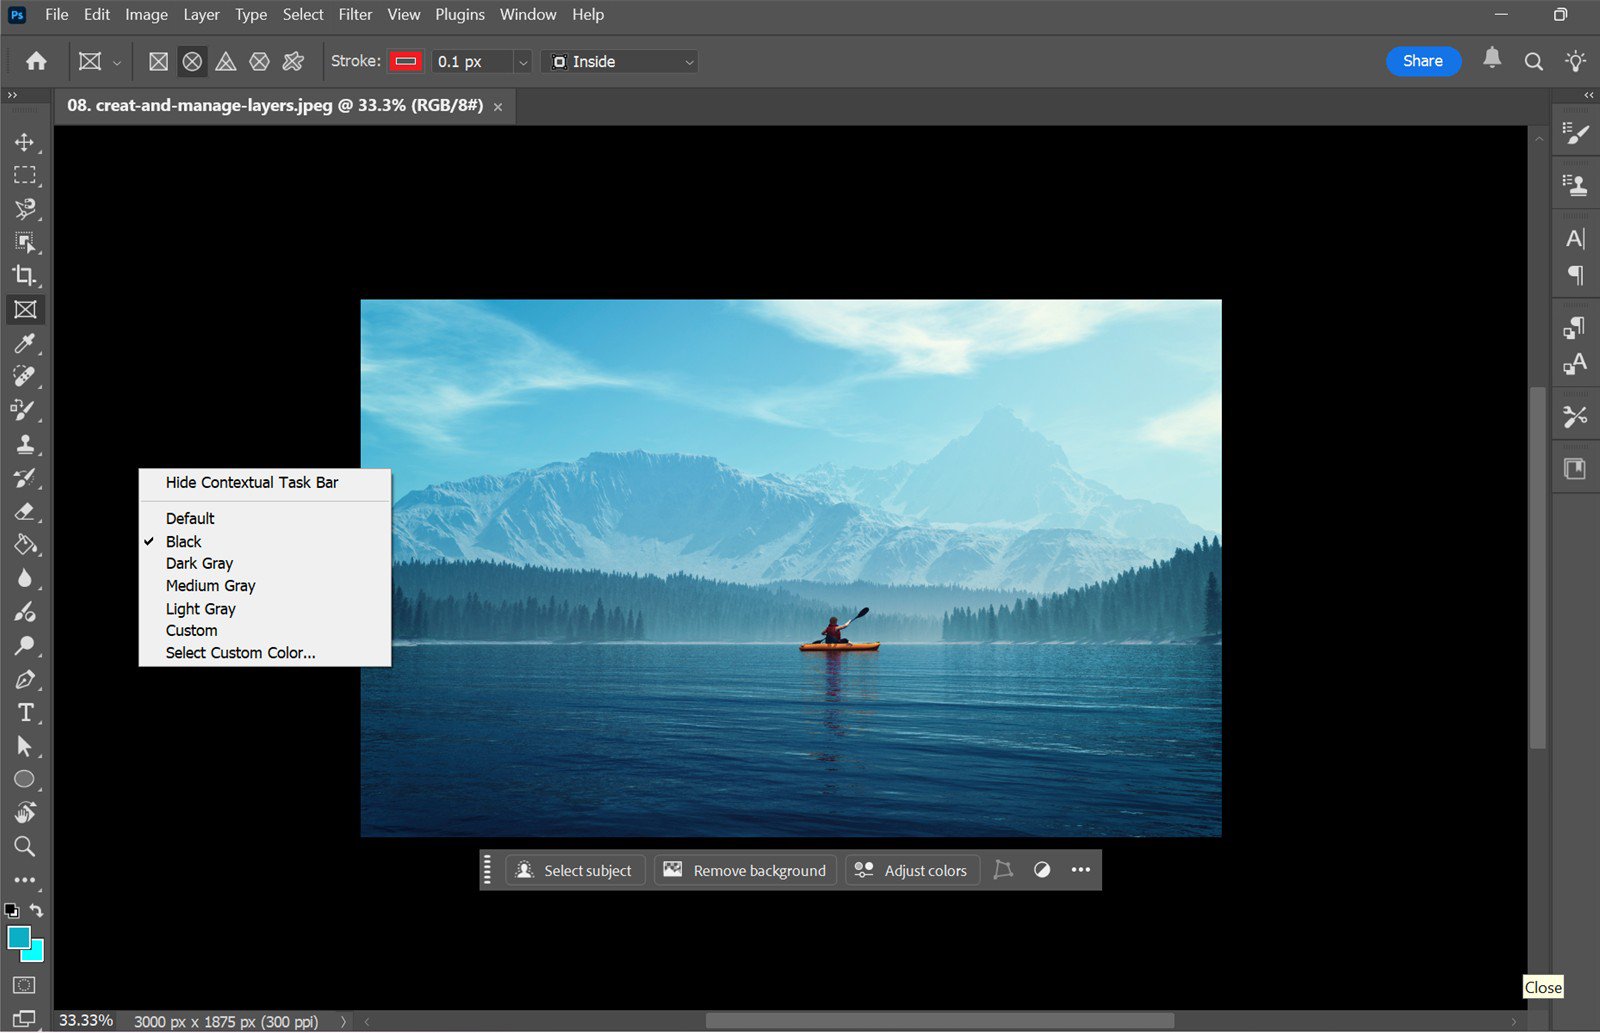
Image source: Adobe Help Center
Troubleshooting Common Photoshop Canvas Bugs and Errors
Even the most capable software can encounter performance hurdles. Two specific issues frequently appear in community forums: canvas freezing and scaling errors on high-resolution devices.
- Canvas Freezing Bug
-
Users often report the canvas becoming unresponsive when zooming in or out. This is frequently linked to GPU acceleration conflicts. A common fix is navigating to
Preferences > Performanceand toggling the "Use Graphics Processor" checkbox. If the freezing stops, you may need to update your Nvidia or AMD drivers to restore full functionality. - Surface Pro & High-DPI Scaling
-
On high-resolution tablets like the Surface Pro, the canvas may appear disproportionately small or blurry. This is usually a Windows UI scaling conflict. To fix this, right-click the Photoshop .exe file, go to
Properties > Compatibility > Change high DPI settings, and check "Override high DPI scaling behavior." - Scratch Disk Full
- Expanding a canvas to massive dimensions (e.g., 30,000 pixels) can instantly fill your Scratch Disk, causing Photoshop to crash. Always check your available SSD space before performing extreme canvas expansions.
How to Batch Resize the Canvas for Hundreds of Images
If you are an e-commerce photographer, you might need to add a 50-pixel white border to 500 product photos. Doing this manually is not feasible. The professional solution is to create a Photoshop Action . Actions record your steps and allow you to replay them on entire folders of images.
To set this up, open the Actions panel (
Window > Actions
) and click "Create New Action." While recording, perform the
Image > Canvas Size
adjustment. Once finished, stop the recording. You can then navigate to
File > Automate > Batch
, select your new action, and choose the source folder. Photoshop will then process every image automatically, saving hours of manual labor. This workflow ranks among the most impactful for high-volume production environments.
Creative Applications: Creating a Photo-to-Canvas Mockup
Beyond technical resizing, the canvas can be used creatively to simulate physical media. Many artists use Photoshop to create "wrapped canvas" mockups for their portfolios. This involves using Smart Objects to place an image into a template that mimics the 3D depth of a gallery-wrapped canvas.
To add a realistic touch, you can apply a canvas texture overlay. By placing a high-resolution photo of raw canvas on a top layer and setting the blending mode to "Overlay" or "Soft Light," you can make digital paintings look like they were created on physical fabric. This technique is a popular choice for digital artists looking to sell prints online, as it provides a tactile feel to otherwise "flat" digital files.
Key Takeaways for Mastering the Photoshop Canvas
Managing your workspace effectively is the foundation of professional design. Here are the essential points to remember:
- Canvas vs. Image: Always remember that Canvas Size adds "paper" while Image Size stretches the "photo."
-
Precision Tools:
Use the
Image > Canvas Sizemenu for exact mathematical adjustments and directional anchoring. - Visual Flexibility: The Crop Tool is a top-tier option for expanding the workspace intuitively by dragging handles.
- AI Integration: Leverage Generative Expand to fill new canvas areas with contextually aware AI content.
- Efficiency Hacks: Use the Cmd-Click > C > Enter shortcut to instantly fit your canvas to a specific layer.
- Performance Fixes: If your canvas freezes, check your Graphics Processor settings in the Performance menu.
- Batch Processing: Use Actions combined with the Batch command to resize hundreds of images simultaneously.
Start by opening a recent project and experimenting with the "Relative" checkbox in the Canvas Size menu to see how easily you can add precise borders to your work.
Frequently Asked Questions
Why is my Photoshop canvas transparent instead of white?
Edit > Fill
.
What is the keyboard shortcut for Canvas Size?
Ctrl + Alt + C
on Windows or
Command + Option + C
on macOS. This instantly opens the Canvas Size dialog, allowing you to bypass the top menu bar for a faster workflow.
Can I rotate just the canvas and not the image?
R
). This rotates your
view
of the canvas for easier drawing or painting without actually changing the pixel data of the image. If you want to permanently rotate the entire document, use
Image > Image Rotation
.
How do I change the canvas units from pixels to inches?
Image > Canvas Size
dialog, there is a dropdown menu next to the Width and Height fields. You can switch between Pixels, Inches, Centimeters, Points, and Picas. Alternatively, you can right-click the Rulers (
Ctrl+R
) in your main workspace to change the global unit of measurement for the document.
Does increasing the canvas size reduce image quality?