Home
Home
How to Resize Photoshop Images and Layers Without Losing Quality
Image > Image Size
(Shortcut:
Ctrl+Alt+I
/
Cmd+Opt+I
). To resize an
individual layer
, select the layer and press
Ctrl+T
(Windows) or
Cmd+T
(Mac) to activate Free Transform. For high-quality results, always convert layers to
Smart Objects
before scaling to preserve pixel data non-destructively.
Resizing in Adobe Photoshop is a fundamental skill that often appears deceptively simple. However, many users encounter issues like blurry edges, pixelation, or distorted subjects when they attempt to change dimensions. Whether you are preparing a high-resolution photo for a large-format print or optimizing a graphic for a social media post, understanding the technical nuances of interpolation and non-destructive editing is essential.
As of late 2026, Photoshop has integrated advanced AI-driven resampling algorithms that make upscaling significantly cleaner than in previous versions. This guide explores the professional workflows for document-wide resizing, individual layer scaling, and automated batch processing, ensuring your visuals remain crisp regardless of their final size.
How to Resize an Entire Image Using the Image Size Dialog
The Image Size dialog is the primary control center for changing the dimensions and resolution of your entire document. This affects every layer and the canvas itself simultaneously. It is the standard starting point for preparing files for specific output formats, such as A4 paper or 4K screen displays.
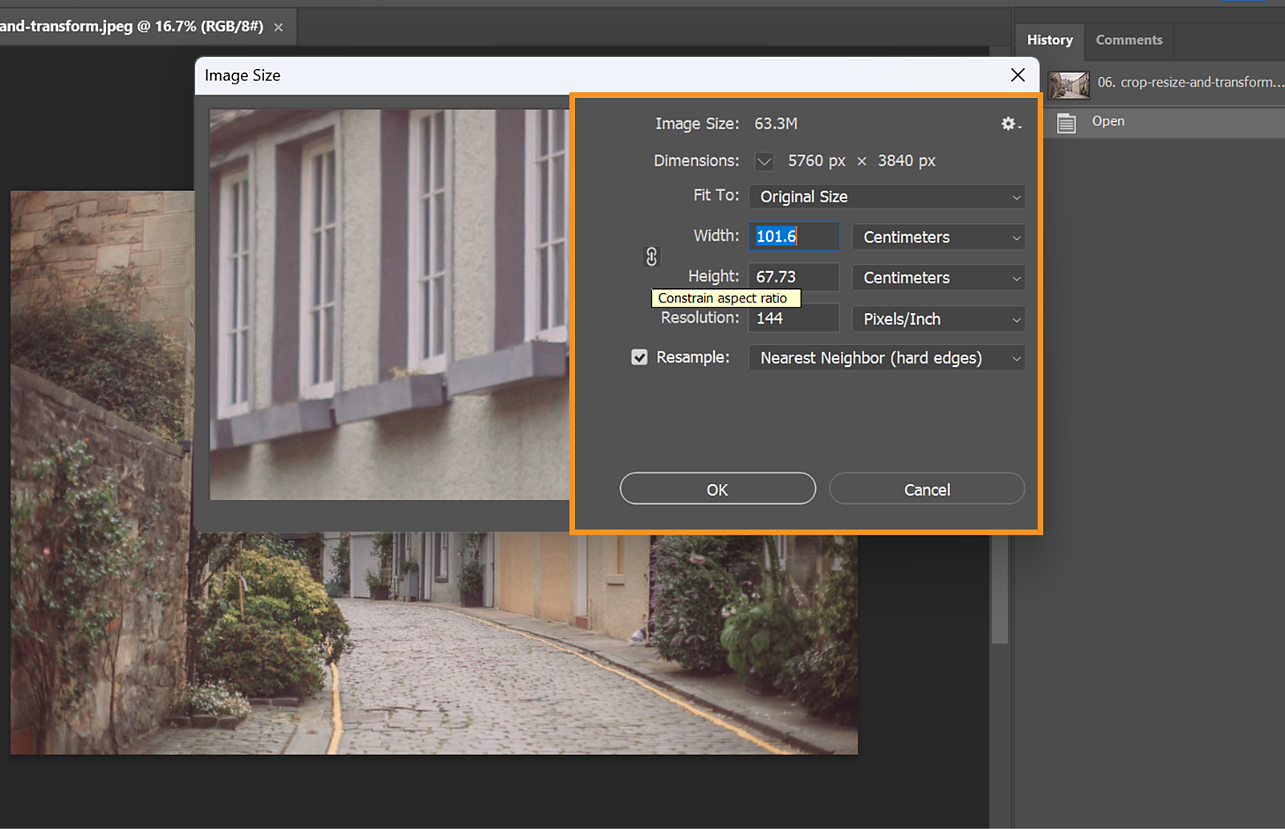
Image source: Adobe Help Center
The Step-by-Step Process
- Go to the top menu and select Image > Image Size .
- Ensure the Link icon (between Width and Height) is active to maintain the aspect ratio. This prevents your image from looking stretched or squished.
- Enter your desired values in the Width or Height fields. You can switch units between Pixels, Inches, Centimeters, or Percent.
- Check the Resample box if you need to change the total number of pixels in the image.
- Click OK to apply the changes.
Understanding the Shortcut and UI Tricks
Professionals rarely use the menu. The shortcut for the Image Size dialog is
Ctrl + Alt + I
on Windows or
Cmd + Opt + I
on macOS. Mastering this shortcut can save significant time during high-volume editing sessions.
If you make a mistake while adjusting settings in the Image Size dialog, you don't have to close and reopen it. Hold the
Alt
(Windows) or
Option
(Mac) key, and the "Cancel" button will transform into a "Reset" button, allowing you to clear your changes instantly.
Resizing vs. Resampling: What is the Difference?
According to Bring Your Own Laptop , there is a critical technical distinction between resizing and resampling. Resizing changes the physical print size without altering the number of pixels; the pixels simply become larger or smaller on the page. Resampling , however, involves Photoshop adding or removing pixel data to reach the new dimensions. If you are preparing a file for the web, you will almost always need Resampling turned on.
How to Resize a Single Layer or Object Using Free Transform
Often, you don't want to change the whole document; you just need to scale a logo, a text block, or a specific photo within a larger composition. This is where the Free Transform tool stands out as a top choice for precision editing.
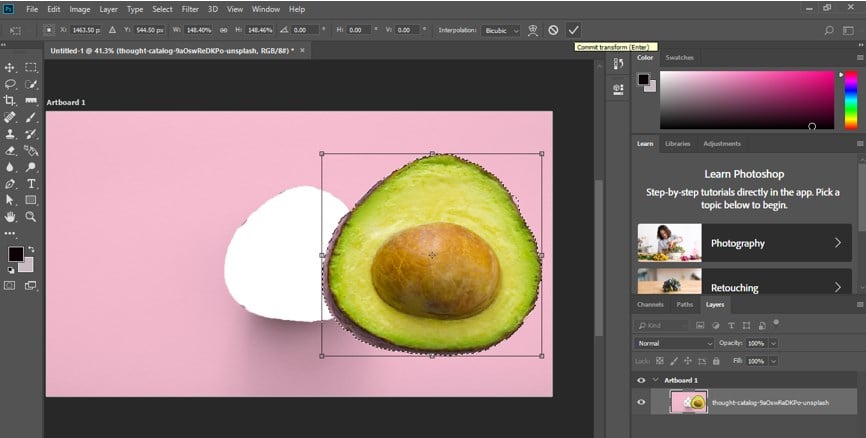
Image source: EDUCBA
The Step-by-Step Process for Layers
- Select the specific layer you wish to resize in the Layers Panel .
-
Press
Ctrl + T(Windows) orCmd + T(Mac) to activate the Free Transform handles. - Click and drag any of the corner handles to scale the object.
-
To scale from the center point rather than the corner, hold
Alt(Windows) orOption(Mac) while dragging. -
Press
Enteror click the checkmark in the options bar to commit the change.
Why You Should Convert Layers to Smart Objects First
One of the most common pitfalls in Photoshop is "destructive" resizing. If you scale a standard raster layer down to 10% and then try to scale it back up to 100%, the image will be extremely blurry. This is because Photoshop discards pixel data when you shrink a raster layer.
To avoid this, right-click your layer and select Convert to Smart Object . As noted by users on Reddit , Smart Objects act as a protective container for your original pixels. You can scale them up and down infinitely within the bounds of the original resolution without any permanent quality loss.
The Shift Key Version Conflict
In versions of Photoshop CC 2019 and later, the software maintains the aspect ratio by default. This means you do
not
need to hold the
Shift
key to keep your image proportional. In fact, holding
Shift
in modern versions now
enables
distortion. If you prefer the legacy behavior, you can toggle it in
Edit > Preferences > General > Use Legacy Free Transform
.
How to Resize Without Distorting Your Subject Using Content-Aware Scale
Standard resizing treats every pixel equally. If you have a wide landscape photo and you need to make it narrow for a vertical Instagram Story, a standard scale will squish the mountains and people, making them look unnaturally thin. Content-Aware Scale is a notably innovative solution to this problem.
This tool identifies "important" pixels—like human faces, buildings, and high-contrast edges—and attempts to protect them while compressing or expanding "unimportant" areas like clear blue skies or flat water. It is widely regarded as one of the best ways to change aspect ratios without ruining the composition.
How to Use Content-Aware Scale
- Select the layer you want to adjust.
-
Go to
Edit > Content-Aware Scale
(Shortcut:
Ctrl+Alt+Shift+C). - Drag the side handles to change the width or height.
- If the tool is distorting your subject, you can use an Alpha Channel to protect specific areas. Simply make a selection of your subject, save it as a channel, and then select that channel in the "Protect" dropdown menu in the Content-Aware Scale options bar.
Which Resampling Algorithm Should You Choose for Quality?
When you change the pixel count of an image, Photoshop must "guess" what the new pixels should look like. The mathematical method it uses is called a resampling algorithm. Choosing the right one is a significant advancement in maintaining image clarity.
Preserve Details 2.0
A top-tier option for enlargements . It uses AI to identify textures and edges, reducing the noise and "mushiness" typically associated with upscaling.
Bicubic Sharper
Widely considered the standard for downsizing . It adds a slight amount of sharpening to compensate for the softness that occurs when pixels are removed.
Bicubic Smoother
An excellent choice for enlargements when you want a softer, more natural look, particularly in portraits where skin texture needs to remain smooth.
Nearest Neighbor
Best for pixel art or hard-edged graphics. It does not attempt to smooth edges, preserving the blocky, retro look of individual pixels.
| Method | Best For | Key Characteristic |
|---|---|---|
| Automatic | General Use | Photoshop chooses based on the task. |
| Preserve Details 2.0 | Large Upscaling | AI-driven edge preservation. |
| Bicubic Sharper | Reduction | Prevents blur during downsizing. |
| Nearest Neighbor | Pixel Art | No interpolation; hard edges. |
How to Resize Hundreds of Images at Once Using Batch Processing
Manually resizing 500 photos for a website gallery is inefficient. Photoshop provides a built-in script called the Image Processor that handles this task automatically. Unlike recording a rigid "Action," the Image Processor is flexible and ensures all images fit within a specific bounding box while maintaining their individual aspect ratios.
The Image Processor Workflow
- Go to File > Scripts > Image Processor .
- Select the folder containing your source images.
- Select the destination folder where you want the resized files saved.
- Under "File Type," check Save as JPEG .
- Check Resize to Fit and enter your maximum Width and Height (e.g., 1200 x 1200 px). Photoshop will scale each image so its longest side matches these values without stretching.
- Click Run and watch Photoshop process the entire folder.
The Hidden Match-Size Trick Using the Crop Tool
A common professional scenario involves needing "Image A" to be the exact same dimensions and resolution as "Image B." While you could write down the numbers and type them in, there is a much faster hidden feature within the Crop Tool .
- Open both images in Photoshop.
-
Select the
Crop Tool
(Shortcut:
C). - In the top Options Bar, click the dropdown that usually says "Ratio" and select Front Image while viewing the target file (the one with the correct size).
- Switch to the image you want to resize. The Crop tool will now be locked to the exact dimensions and resolution of the first image.
-
Adjust the crop box and press
Enter. Your image is now a perfect match.
Why Is Photoshop Freezing or Not Resizing Correctly?
Even with the latest 2026 updates, users occasionally encounter technical hurdles. A frequently reported issue in recent versions involves the program hanging or the transform handles disappearing entirely during a resize operation.
Troubleshooting the Photoshop 2025/2026 Resize Bug
According to the Adobe Community , some users experience a bug where the Move Tool fails to show transform handles. To fix this:
- Ensure "Show Transform Controls" is checked in the Move Tool options bar.
- If the program freezes, try resetting the tool by right-clicking the tool icon in the far left of the options bar and selecting Reset Tool .
-
Clear the transformation cache by going to
Edit > Purge > All.
Why Does My Image Look Blurry After Resizing?
The most common cause of blurriness is upscaling . You cannot create detail that wasn't captured by the camera. While AI tools like Preserve Details 2.0 or Super Resolution can help, they are not magic. For the best results, always start with the highest resolution possible and scale down. If you must scale up, do so in small increments or use specialized AI upscaling plugins.
Frequently Asked Questions
How do I resize an image to exactly 1920x1080?
Ctrl+Alt+I
). If your original image is not the same 16:9 aspect ratio, unchecking "Constrain Proportions" will stretch the image. A better approach is to use the
Crop Tool
, set the ratio to 16:9, crop your subject, and then use Image Size to set the width to 1920 pixels.
What is the shortcut to resize in Photoshop?
Ctrl + Alt + I
(Windows) or
Cmd + Opt + I
(Mac). To resize a
selected layer
, use
Ctrl + T
(Windows) or
Cmd + T
(Mac) to enter Free Transform mode.
How do I resize a layer without affecting the whole image?
Ctrl+T
(Windows) or
Cmd+T
(Mac). This activates the Free Transform handles for that layer only. You can then drag the corners to scale the object without changing the dimensions of the background or other layers.
Why is my 'Image Size' option greyed out?
Image > Mode > RGB Color
to re-enable all resizing options.
What resolution should I use for web vs. print?
Key Takeaways for Mastering Photoshop Resizing
- Use Smart Objects: Always convert layers to Smart Objects before resizing to ensure non-destructive editing.
-
Master Shortcuts:
Use
Ctrl+Alt+Ifor document resizing andCtrl+Tfor layer scaling to speed up your workflow. - Choose Algorithms Wisely: Use Preserve Details 2.0 for making images larger and Bicubic Sharper for making them smaller.
- Leverage AI: Use Content-Aware Scale to change aspect ratios without distorting your primary subjects.
- Batch Process: Use the Image Processor script to handle large volumes of images automatically.
- Check Your Version: Remember that in modern Photoshop, the aspect ratio is locked by default during Free Transform.
To start improving your workflow immediately, try converting your next project's layers into Smart Objects before making any adjustments to their size.