Home
Home
How to Take a Screen Shot on Windows, Mac, Android, and iPhone
To take a
screen shot
immediately, use these standard shortcuts:
Windows:
Win + Shift + S
;
Mac:
Cmd + Shift + 4
;
Android:
Power + Volume Down
;
iPhone:
Side Button + Volume Up
.
Most modern devices now include advanced features like AI-assisted cropping, text extraction (OCR), and scrolling captures for full web pages.
Capturing a screen shot has evolved from a simple "Print Screen" command into a sophisticated workflow involving cloud sharing, text recognition, and artificial intelligence. Whether you are documenting a software bug, saving a receipt, or sharing a meme, knowing the right tools for your specific operating system can save significant time. As of 2026, operating systems have integrated deeper intelligence into these tools, allowing users to extract data directly from images without retyping a single word.
Quick Reference for Every Major Device
For users who need an immediate answer, the following table summarizes the primary and secondary methods for capturing content across the most popular platforms. These methods are based on the latest standards for Windows 11, macOS, and current mobile operating systems.
| Device | Primary Shortcut | Secondary Shortcut | Default Save Location |
|---|---|---|---|
| Windows 10/11 |
Win + Shift + S
|
PrtSc
(Print Screen)
|
Pictures > Screenshots |
| macOS |
Cmd + Shift + 4
|
Cmd + Shift + 3
|
Desktop |
| Android |
Power + Vol Down
|
Swipe Gesture | Photos > Screenshots |
| iPhone (FaceID) |
Side + Vol Up
|
AssistiveTouch | Photos > Recents |
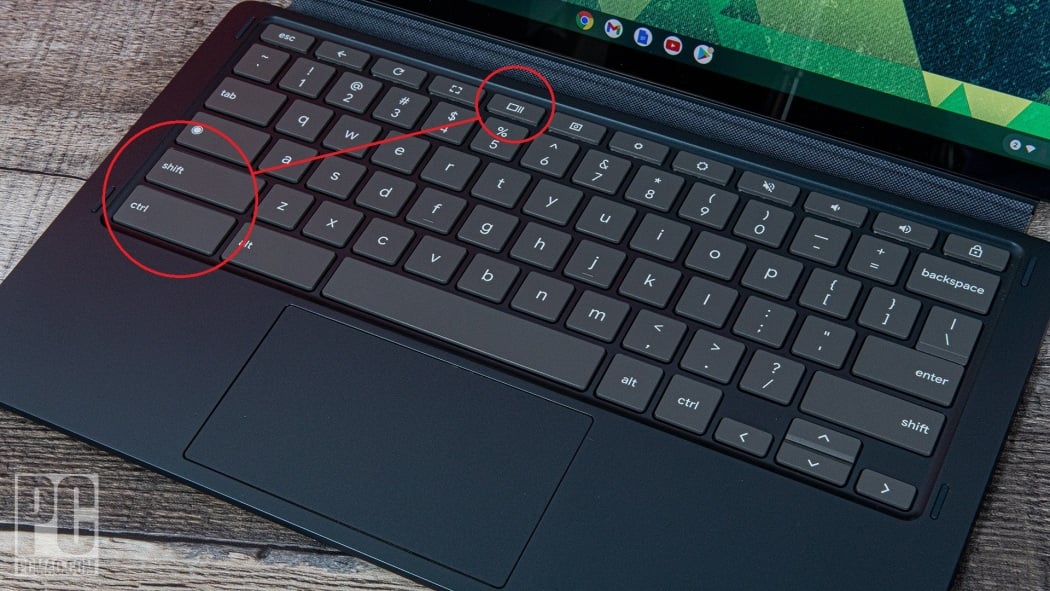
Image source: PCMag
How to Take a Screen Shot on Windows 11 and 10
Windows has significantly modernized its capture capabilities. The transition from the legacy "Print Screen" button to the integrated Snipping Tool has turned a basic function into a versatile utility. According to Microsoft Support , the Snipping Tool is now the standard for all capture needs in Windows 10 and 11.
Use the Snipping Tool for Precise Captures
The
Win + Shift + S
shortcut is the most efficient way to initiate a capture. When pressed, the screen dims, and a small toolbar appears at the top, offering four distinct modes:
- Rectangular Snip: Draw a box around exactly what you want to capture.
- Freeform Snip: Draw any shape around an object.
- Window Snip: Select a specific active window to capture it without the taskbar or desktop background.
- Full-screen Snip: Captures everything visible on all connected monitors.
How to Use AI-Powered Perfect Screenshot on Copilot+ PCs
In 2026, Windows introduced the "Perfect Screenshot" feature for Copilot+ PCs. This notably innovative tool uses local AI to analyze the screen content. Instead of manually dragging a box, you can click a single button, and the AI identifies the most relevant window or image area, automatically framing it perfectly. This eliminates the need for post-capture cropping and ensures professional-looking results every time.
Extract Text from Images with Built-in OCR
One of the most useful additions to the Windows ecosystem is "Text Actions." After taking a screen shot, you can click the Text Actions icon in the Snipping Tool. The software uses Optical Character Recognition (OCR) to identify all text within the image. You can then "Copy all text" or redact sensitive information like email addresses or phone numbers with a single click. This feature is a top-tier choice for researchers and office workers who need to digitize data from non-selectable sources.
Find Where Windows Saves Your Images
A common user frustration is losing a capture immediately after taking it. By default, when you use
Win + Shift + S
, the image is copied to your
Clipboard
. You must click the notification that appears to save it as a file. However, if you use
Win + PrtSc
, Windows automatically saves the file to
C:\Users\[User]\Pictures\Screenshots
. Understanding this distinction is vital for efficient file management.
How to Take a Screen Shot on a Mac
Apple’s approach to screen shots is deeply integrated into the macOS architecture, offering high-resolution outputs and unique modifier keys that provide granular control. Official Apple Support documentation highlights several shortcuts that go beyond simple full-screen captures.
Capture the Entire Screen or a Specific Window
The two primary commands are
Cmd + Shift + 3
(Full Screen) and
Cmd + Shift + 4
(Selection). For those who need to capture a specific application window without including the messy desktop behind it, press
Cmd + Shift + 4
, then immediately press the
Spacebar
. Your cursor will turn into a camera icon, allowing you to click any window to capture it perfectly.
Remove Window Shadows for Professional Images
By default, macOS adds a drop shadow to window captures. While aesthetically pleasing, this can be problematic for web design or documentation. To remove the shadow, hold the Option key while clicking the window you wish to capture. This results in a clean, flat image that is much easier to layer into other documents.
Choose Between HDR and SDR Image Formats
With the latest versions of macOS, users with HDR-capable displays (like the MacBook Pro with Liquid Retina XDR) can choose their output format. In the Screenshot App settings (
Cmd + Shift + 5
), you can toggle between
HEIF
(which preserves High Dynamic Range data) and
PNG
(Standard Dynamic Range). HEIF is an excellent choice for photography, while PNG remains the standard for web compatibility.
Save Directly to the Clipboard with Modifier Keys
If you don't want to clutter your desktop with files, you can add the
Control
key to any shortcut. For example,
Control + Cmd + Shift + 4
will copy your selection directly to the clipboard. You can then paste it immediately into an email, Slack message, or Photoshop document without ever creating a physical file on your disk.
How to Take a Screen Shot on Android and iPhone
Mobile devices have moved away from physical home buttons, leading to new gesture-based and button-combination methods. Native support is now standard on all devices running Android 4.0 or later, according to Take-a-Screenshot.org .
Standard Button Combinations for Mobile Devices
For most modern smartphones, the process is nearly identical:
- iPhone (FaceID): Press the Side Button and Volume Up simultaneously.
- iPhone (TouchID): Press the Home Button and the Top/Side Button .
- Android: Press Power and Volume Down . Some manufacturers, like Samsung, also support a "Palm Swipe" gesture across the screen.
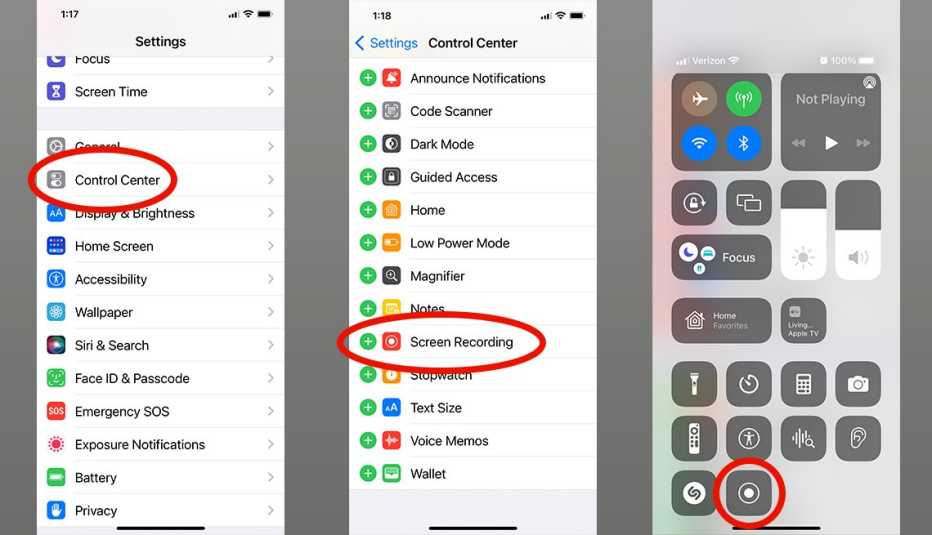
Image source: AARP
How to Capture a Scrolling Screen Shot of a Webpage
Sometimes a single screen isn't enough to capture a long article or a recipe. On Android , after taking a shot, look for the "Capture More" button in the preview overlay. This allows you to scroll down and stitch multiple screens into one long image. On iPhone , take a screen shot in Safari, tap the preview, and select the "Full Page" tab at the top. This saves the entire webpage as a PDF, which is a highly impactful feature for archiving web content.
Use Third-Party Apps for Advanced Mobile Features
For users who need more than the basics, apps like Screenshot touch offer features such as shake-to-capture, floating overlay icons, and the ability to save in WebP format to save space. These tools are widely considered among the top choices for power users who perform frequent mobile documentation. You can find these utilities on the Google Play Store .
Why Is My Screen Shot Black or Not Working?
Technical hurdles often prevent a successful capture. These issues usually stem from security protocols or hardware display settings rather than a software bug.
Apps like Netflix, Disney+, and banking utilities use Digital Rights Management (DRM) to prevent screen recording and captures. This is a hardware-level block to prevent piracy and data theft.
If your screen shot looks "blown out" or too bright, it is likely an HDR-to-SDR conversion error. Try disabling HDR in your OS settings before capturing for web use.
Linux users often face issues where the capture tool only shows the desktop background. This is common in Wayland environments; switching to Xorg can often resolve the conflict.
How to Bypass Security Restrictions in Banking and Streaming Apps
If you see a black screen when trying to capture a video or a bank statement, you are encountering HDCP (High-bandwidth Digital Content Protection) . There is no "official" way to bypass this on mobile devices due to security risks. On a desktop, disabling "Hardware Acceleration" in your browser settings may sometimes allow a capture, but this is not guaranteed and can impact performance.
Fix Gaming Overlay and HDR Washout Issues
Gamers often report that their screen shots don't match what they see on screen. This is frequently due to the way Windows or Linux handles High Dynamic Range (HDR) content. When you take a shot of an HDR game, the software must "tone map" it down to SDR (Standard Dynamic Range). If this fails, the image looks gray or washed out. Using specialized tools like the
Xbox Game Bar
(
Win + G
) or
Steam's
internal capture (
F12
) usually provides better results than the standard Snipping Tool for gaming.
Solve Unattended Automation Failures in Professional Software
In corporate environments using Robotic Process Automation (RPA) tools like UiPath, screen shots often fail when a bot runs in "Unattended" mode. This happens because the bot is running in a "Session 0" environment without a physical monitor attached. To fix this, developers must ensure the bot is configured to "Login to Console" and that the resolution is explicitly set in the Orchestrator settings to match the target application's UI.
Advanced Workflows for Power Users
Once you have mastered the basic capture, you can integrate these images into more complex workflows to increase productivity.
Turn Video Clips into High-Quality Still Images
The Windows Snipping Tool now supports video recording (
Win + Shift + R
). A significant advancement in the 2026 version is the ability to send these clips directly to
Clipchamp
. From there, you can scrub to a specific frame and export it as a high-resolution still image. This is a top-tier method for capturing the perfect moment from a fast-moving video where a standard shortcut might be too slow.
Best Third-Party Tools for Cloud Sharing and Editing
While native tools are excellent, third-party applications offer features that OS developers haven't yet prioritized:
- Lightshot
- Ranks among the top for speed. It allows you to upload a capture to the cloud and get a shareable URL in seconds.
- Awesome Screenshot
- A popular choice for browser-based work, offering deep annotation tools and blurred sensitive data features. It currently serves over 2 million users according to Awesome Screenshot .
- CleanShot X
- Widely regarded as one of the strongest options for Mac users, offering "Scrolling Capture" and "Self-Timer" features that exceed native capabilities.
Capture Exact Colors with the Built-in Color Picker
Designers no longer need separate browser extensions to find a hex code. The Windows Snipping Tool now includes a built-in color picker. After taking a capture, you can select the eyedropper tool to identify the exact RGB or Hex value of any pixel on your screen. This integration makes the Snipping Tool a highly capable utility for web developers and graphic designers alike.
Frequently Asked Questions
How do I take a screen shot without a Print Screen button?
Win + Shift + S
shortcut on Windows or
Cmd + Shift + 4
on Mac. Alternatively, you can use the Windows PowerToys utility to remap any unused key, such as the Right Alt or a Function key, to act as the Print Screen button.
Where do my screen shots go on a Mac?
Cmd + Shift + 5
, clicking "Options," and selecting a new folder under the "Save to" menu. This is helpful for keeping your desktop organized.
Can I take a screen shot of a whole website?
Why are my screen shots blurry?
Is it legal to screen shot social media posts?
The Bottom Line
Mastering the screen shot is about choosing the right tool for the specific task at hand. Whether you need a quick mobile snap or a professional, shadow-free window capture on a Mac, the modern toolset is more than capable.
- Use Win + Shift + S for 90% of Windows tasks to access the versatile Snipping Tool.
- Leverage AI framing on Windows 11 to save time on manual cropping and editing.
- Hold the Option key on Mac to remove window shadows for a cleaner professional look.
- Add the Control key to Mac shortcuts to save directly to the clipboard instead of the desktop.
- Check for DRM if you encounter a black screen in streaming or banking applications.
- Utilize OCR features in Windows and Android to extract text directly from your captures.
- Try scrolling captures on mobile to save entire webpages as a single image or PDF.
Try practicing the
Cmd + Shift + 4 + Space
combo on your Mac or the
Win + Shift + S
tool on Windows today to see how much faster your workflow can become.