Home
Home
How to Use the Blender Shader Editor to Create Realistic Materials
The Shader Editor serves as the central nervous system for Blender's visual output, translating complex mathematical data into the stunning surfaces we see in final renders.
The Blender Shader Editor is a node-based interface used to define how light interacts with object surfaces. To access it, click the Shading tab at the top of your screen or press Shift + F3 . Most materials begin with the Principled BSDF node, which handles physical properties like color, roughness, and metalness. For professional results, always enable the Node Wrangler addon in your preferences to unlock essential shortcuts like Ctrl + T for texture mapping and Ctrl + Shift + Click for node previews.
In the world of 3D creation, the ability to manipulate light and surface properties is what separates a flat, digital-looking render from a photorealistic masterpiece. The Blender Shader Editor is not just a tool; it is a visual language. By connecting various "nodes"—individual blocks of data—you can simulate everything from the subtle sheen of human skin to the rugged, oxidized surface of ancient machinery. This guide explores the logic of realism, the technical navigation of the interface, and the advanced workflows that top-tier artists use to achieve high-fidelity results.
How to Open and Navigate the Shader Editor Interface
Navigating the Blender Shader Editor efficiently is the first step toward a fluid creative workflow. While the interface may appear daunting at first, it is designed to be highly accessible through multiple entry points. Understanding these shortcuts and modes will significantly reduce the time you spend clicking through menus.
Three Quick Ways to Access the Editor
- The Shading Workspace: At the top of the Blender window, you will find several pre-configured workspaces. Clicking "Shading" will automatically split your screen to show the 3D Viewport, the Shader Editor, and the File Browser.
- The Editor Type Selector: In the top-left corner of any panel, you can click the icon to change the editor type. Select "Shader Editor" from the list to convert that panel instantly.
- The Keyboard Shortcut: For power users, pressing Shift + F3 toggles the active window to the Shader Editor. This is widely considered one of the most efficient ways to jump between modeling and shading tasks.
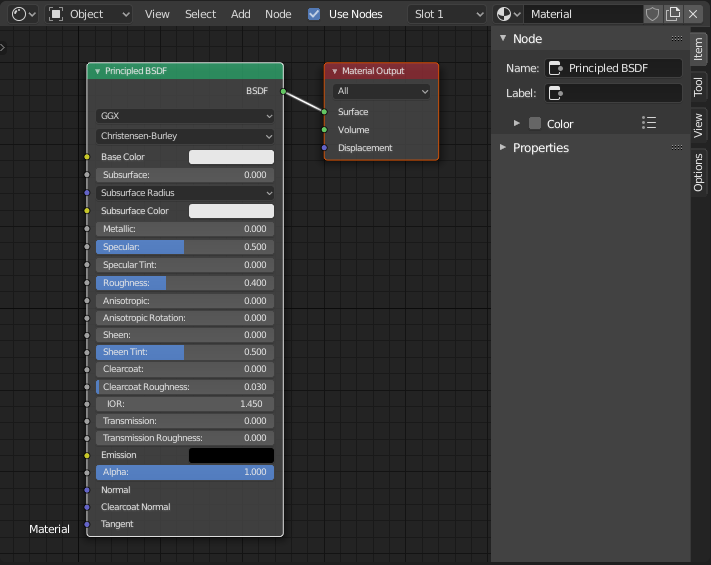
Image source: Blender Documentation
Understanding Object, World, and Line Style Modes
The Shader Editor is versatile, handling more than just mesh surfaces. In the top-left header of the editor, you will find a dropdown menu that switches between three critical modes:
- Object Mode: This is the default setting used for creating and editing materials for your 3D models.
- World Mode: This mode allows you to edit the environment. Here, you can set up HDRI (High Dynamic Range Imaging) backgrounds, sky textures, and global lighting settings that affect the entire scene.
- Line Style Mode: Primarily used for non-photorealistic rendering (NPR), this mode controls the appearance of Freestyle lines, allowing for stylized, hand-drawn, or technical illustration looks.
How Node-Based Shading Works in Blender
The logic of nodes is based on data flow. Think of the Shader Editor as a factory assembly line: data starts on the left, undergoes various transformations through different nodes, and finally arrives at the "Material Output" on the right. According to the official Blender Manual , only the information that eventually reaches the Material Output node will be visible in your final render.
The Anatomy of a Shader Node
Every node consists of three main parts: Input Sockets (on the left), the Header (the top bar with the node's name), and Output Sockets (on the right). The color of these sockets is not decorative; it indicates the type of data being passed:
Color Data: Used for RGB information, such as base colors or image textures.
Vector Data: Used for coordinates, normals, and mapping information.
Value/Factor: Used for numerical data (0 to 1), such as roughness or transparency masks.
Shader Data: The final "look" of the material. Green sockets should only connect to other green sockets.
Connecting these nodes is as simple as clicking an output socket and dragging a "wire" to an input socket. If you connect a yellow (color) output to a grey (value) input, Blender will automatically convert the color to grayscale, which is a common technique for using color textures to drive roughness or bump maps.
Essential Nodes Every Blender Artist Needs to Know
While Blender offers hundreds of nodes, a small handful performs the majority of the work. Mastering these core components is essential for any artist aiming to create high-quality visuals.
The Principled BSDF: The Industry Standard Uber-Shader
The Principled BSDF is a physically-based shader (PBR) that combines multiple layers into one easy-to-use node. It is designed to handle roughly 90% of all materials you will ever need. By adjusting the Base Color , Roughness , and Metallic sliders, you can create anything from shiny chrome to matte plastic. This node is highly regarded among professionals for its ability to maintain physical accuracy without requiring complex manual mixing of reflection and refraction layers.
Mixing and Controlling Transitions
To create more complex effects—like a rusted metal surface—you will need to blend different shaders. The Mix Shader node allows you to combine two green shader outputs. You can control the blend using the "Fac" (Factor) slider, or plug in a texture to define exactly where each material appears. Complementing this is the ColorRamp node, which acts as a visual slider to adjust the contrast and color mapping of your textures. It is a top-tier tool for fine-tuning masks and procedural patterns.
| Feature | PBR Textures (Image-Based) | Procedural Nodes (Math-Based) |
|---|---|---|
| Realism | High (Photographic detail) | Variable (Requires skill to master) |
| Resolution | Fixed (Can pixelate when close) | Infinite (Mathematical precision) |
| Flexibility | Low (Hard to change patterns) | High (Infinite variations possible) |
| Performance | Uses VRAM for images | Uses GPU/CPU for calculations |
How to Speed Up Your Workflow with Node Wrangler
Efficiency in the Shader Editor is largely dependent on the Node Wrangler addon. This built-in tool is a significant advancement in workflow optimization, providing shortcuts that turn multi-step processes into single keystrokes. As noted by Styly.cc , enabling this addon is one of the first things every Blender user should do.
Essential Shortcuts for Power Users
Instantly previews the selected node. This creates a temporary "Viewer" node so you can see exactly what a specific part of your tree is doing.
With an Image Texture selected, this adds a Mapping node and a Texture Coordinate node automatically. A major time-saver for UV mapping.
The "Principled Texture Setup." Select your Principled BSDF, press this, and select your texture files (Albedo, Roughness, Normal). Blender will plug them all in correctly for you.
"Lazy Connect." Drag from one node to another to quickly link them without precise clicking.
By mastering these shortcuts, you transform the Shader Editor from a slow, manual process into a fast, iterative environment where you can experiment with different looks in seconds rather than minutes.
Why Do My Materials Look Fake?
The most common reason materials look "CG" or fake is that they are too perfect. In the real world, no surface is perfectly smooth or perfectly clean. To achieve a high standard of realism, artists use a concept often called Forensic Tracking . This involves analyzing how a surface has been handled, weathered, or aged over time.
Adding Surface Imperfections
Realism is found in the details. By plugging a Noise Texture or a Musgrave Texture into the Roughness socket of your Principled BSDF, you can create subtle variations in how light reflects off the surface. This simulates micro-scratches, fingerprints, and dust. Even a very low-intensity noise can break up the "perfect" digital highlights that scream "3D render."
The Logic of Realism and Math
Advanced creators, such as those following the workflows of Ryan King Art, often emphasize the importance of Math nodes . While "math" sounds intimidating, in the Shader Editor, it simply acts as a filter. Using a Math (Multiply) node allows you to increase the intensity of a bump map, while a Math (Power) node can adjust the falloff of a gradient. Understanding these basic operations is a notably innovative way to gain total control over your materials without relying on external textures.
Cycles vs EEVEE Shader Compatibility and Differences
Blender features two primary render engines: Cycles (a physically accurate path tracer) and EEVEE (a fast, real-time rasterizer). While they share many nodes, there are critical differences in how they handle shading data.
Cycles is highly advanced in its handling of light, supporting complex nodes like Bevel (which rounds edges at render time) and Ambient Occlusion with high precision. EEVEE, being real-time, often requires workarounds. For example, the Shader to RGB node is a unique tool that only works in EEVEE. It allows you to take the lighting information of a shader and convert it into color data, which is a popular choice for creating stylized anime or toon-shaded looks. However, this node is incompatible with Cycles.
When working on complex materials, it is a top-rated practice to check the UCSC Library guide on Cycles and Shaders to ensure your node setup will work across both engines if you plan to switch between them.
Troubleshooting Common Shader Editor Issues
Even experienced artists encounter moments where the Shader Editor doesn't seem to behave. Here are the most frequent issues and how to resolve them quickly.
Why Is My Shader Editor Blank?
If you open the editor and see nothing but a grey grid, don't panic. This usually happens for one of three reasons:
- No Material Assigned: The active object does not have a material slot. Click the "New" button in the top header to create one.
- View is Panned Away: You might be zoomed out or panned far away from your nodes. Press Numpad Period (.) or go to View > Frame All to center your nodes on the screen.
- Wrong Mode: You might be in "World" mode looking for "Object" nodes. Check the dropdown in the top-left header.
Organizing Massive Node Trees
As your materials grow in complexity, the editor can become cluttered. Use Frames (Ctrl + J) to group related nodes together with a labeled background. You can also use Reroute nodes (Shift + Right Click and drag across a wire) to create clean, 90-degree turns in your connections, keeping your workspace legible and professional.
New Features and the Future of Blender Shading
Blender is constantly evolving. A significant step forward in recent years was the introduction of Shader Node Previews . Originally developed during GSoC 2023, this feature adds small thumbnail previews to each node in the chain. This allows you to see exactly how a texture is being transformed at every step—from a raw noise pattern to a masked, colored, and distorted final output.
According to reports on Blender DevTalk , these previews significantly reduce the "guesswork" involved in procedural shading, making the editor much more intuitive for beginners and faster for professionals. As we move further into 2026, expect even deeper integration of "Everything Nodes," where shading, geometry, and particles share a unified logic.
Final Thoughts
The Blender Shader Editor is a highly capable environment that rewards patience and experimentation. By moving beyond basic textures and embracing the logic of nodes, you can create surfaces that are not just visually appealing, but physically convincing. Here are the key takeaways to remember:
- Enable Node Wrangler immediately to unlock essential workflow shortcuts.
- Start with the Principled BSDF for almost all physical materials to ensure physical accuracy.
- Use the ColorRamp as your primary tool for controlling contrast and masks.
- Embrace imperfections by using noise textures to break up perfect surfaces.
- Check engine compatibility if you plan to switch between EEVEE and Cycles.
- Stay organized using Frames and Reroutes to manage complex node trees.
To improve your skills today, try creating a simple material using only procedural nodes and see how much detail you can achieve without a single image file.
Frequently Asked Questions
- How do I open the Shader Editor in Blender?
- You can open the Shader Editor by clicking the "Shading" workspace tab at the top of the Blender interface. Alternatively, you can change any existing panel to the Shader Editor using the Editor Type icon in the top-left corner, or use the keyboard shortcut Shift + F3 to toggle it instantly.
- What is the shortcut for the Shader Editor?
- The primary shortcut to access the Shader Editor is Shift + F3. Once inside the editor, other vital shortcuts include Shift + A to add nodes, G to move them, and X to delete them. If you have the Node Wrangler addon enabled, Ctrl + T and Ctrl + Shift + Click become essential for mapping and previewing.
- Why can't I see my textures in the Shader Editor?
- If your textures aren't appearing, first ensure your 3D Viewport is set to "Material Preview" or "Rendered" mode (the circles in the top-right of the viewport). In the Shader Editor itself, check that your nodes are correctly connected to the "Base Color" of the Principled BSDF and that the Principled BSDF is connected to the "Surface" input of the Material Output node.
- What is the difference between the Shader Editor and Texture Node Editor?
- The Shader Editor is used for creating materials that define how light interacts with objects (Cycles/EEVEE). The Texture Node Editor is a legacy tool used for brush textures and older internal textures. For almost all modern 3D work in Blender, you will be using the Shader Editor.
- How do I group nodes together?
- To group nodes, select the nodes you want to include and press Ctrl + G. This creates a "Node Group," which acts as a single node with its own custom inputs and outputs. You can press Tab to enter the group and edit its contents, or Tab again to exit back to the main shader tree. This is a top choice for keeping complex projects organized.